Since games get bigger and bigger and their graphic gets more and more impressive I’ve made some panoramic views from In-Game with everything turned to 11.


I am using this for more several years now. Even though all my workflow happens on Macintosh computers these days I’ve kept this tool in my toolbox: Microsoft Image Composite Editor.

Now after along while with the 1.0 version Microsoft Research decided to release a new version of the free tool with even more features and a new streamlined user interface. This is so much better than before.
[youtube]https://www.youtube.com/watch?v=zhdXLH2GYPA[/youtube]
“Image Composite Editor (ICE) is an advanced panoramic image stitcher created by the Microsoft Research Computational Photography Group. Given a set of overlapping photographs of a scene shot from a single camera location, the app creates a high-resolution panorama that seamlessly combines the original images. ICE can also create a panorama from a panning video, including stop-motion action overlaid on the background. Finished panoramas can be shared with friends and viewed in 3D by uploading them to the Photosynth web site. Panoramas can also be saved in a wide variety of image formats, including JPEG, TIFF, and Photoshop’s PSD/PSB format, as well as the multiresolution tiled format used by HD View and Deep Zoom.”
Source 1: http://research.microsoft.com/en-us/um/redmond/projects/ice/
I was on a business trip the other day and the office space of that company was very very nice. So nice that they had all sorts of automation going on to help the people.
For example when you would run into a room where there’s no light the system would light up the room for you when it senses your presence. Very nice!
There was some lag between me entering the room, being detected and the light powering up. So while running into a dark room, knowing I would be detected and soon there would be light, I shouted “Computer! Light!” while running in.
That StarTrek reference brought an old idea back that it would be so nice to be able to control things through omnipresent speech recognition.
I am aware that there’s Siri, Cortana, Google Now. But those things are creepy because they involve external companies. If there are things listening to me all day every day, I want them to be within the premise of the house. I want to know exactly down to the data flow what is going on and sent where. I do not want to have this stuff leave the house at any times. Apart from that those services are working okayish but well…
Let alone the hardware. Usually the existing assistants are carried around in smart phones and such. Very nice if you want to touch things prior to talking to them. I don’t want to. And no, “Hey Siri!” or “OK Google” is not really what I mean. Those things are not sophisticated enough yet. I was using “Hey Siri!” for less than 24 hours. Because in the first night it seemed to have picked up something going on while I was sleeping which made it go full volume “How can I help!” on me. Yes, there’s no “don’t listen when I am sleeping” thing. Oh it does not know when I am sleeping. Well, you see: Why not?
Anyway. What I wish there was:
And all that should be working on a basic level without internet access. Just like that.
So? Any volunteers?

Like every year the Chaos Communication Congress gathered thousands of people in one place between the Christmas-Holidays and NewYears.
Since I was out-of-order this year to attend I’ve opted for the Attending-by-Stream option. All Lectures are live-streamed by the awesome CCC Video Operations Center (C3VOC) and made available as recordings afterwards.
Since the choice of topics is enormous here are some I can recommend:
Source 1: http://events.ccc.de/congress/2014/wiki/Static:Main_Page
Source 2: http://en.wikipedia.org/wiki/Chaos_Communication_Congress
Source 3: http://c3voc.de/
Source 4: http://media.ccc.de/browse/congress/2014/


Here are just two of the panoramic images I’ve made while playing through BioShock Infinite this year. Gorgeous art!


As racing cars with petrol engines gets more and more uninteresting for the masses and even Formula 1 faces competition by Formula E.
Now having humans inside cars racing a wide track is one thing, but using relatively cheap but extremely high-tech multi-copters with first-person-view cameras mounted on them and flown by crazy guys sitting next to the “racing track” is the next big thing!
[youtube]https://www.youtube.com/watch?v=6zDDsX5xYcA[/youtube]
As you can see it basically looks like the Endor-scenes from Star Wars. In fact it does look so interesting that I am tempted to try it myself…
“OpenFlights is a tool that lets you map your flights around the world, search and filter them in all sorts of interesting ways, calculate statistics automatically, and share your flights and trips with friends and the entire world (if you wish). It’s also the name of the open-source project to build the tool.”
Source: http://openflights.org/
“Console framework is cross-platform toolkit that allows to develop TUI applications using C# and based on WPF-like concepts.”
Source 1: http://en.wikipedia.org/wiki/Text-based_user_interface
Source 2: https://github.com/elw00d/consoleframework
Source 3: http://elw00d.github.io/consoleframework/
“Ever notice how people texting at night have that eerie blue glow?
Or wake up ready to write down the Next Great Idea, and get blinded by your computer screen?
During the day, computer screens look good—they’re designed to look like the sun. But, at 9PM, 10PM, or 3AM, you probably shouldn’t be looking at the sun.
f.lux fixes this: it makes the color of your computer’s display adapt to the time of day, warm at night and like sunlight during the day.
It’s even possible that you’re staying up too late because of your computer. You could use f.lux because it makes you sleep better, or you could just use it just because it makes your computer look better.”
Source: https://justgetflux.com/
The next time you stumble across a PDF file with security and not allowing you to print or copy/paste.
Do this:
qpdf –decrypt
“QPDF is a command-line program that does structural, content-preserving transformations on PDF files. It could have been called something like pdf-to-pdf. It also provides many useful capabilities to developers of PDF-producing software or for people who just want to look at the innards of a PDF file to learn more about how they work.
QPDF is capable of creating linearized (also known as web-optimized) files and encrypted files. It is also capable of converting PDF files with object streams (also known as compressed objects) to files with no compressed objects or to generate object streams from files that don’t have them (or even those that already do). QPDF also supports a special mode designed to allow you to edit the content of PDF files in a text editor. For more details, please see the documentation links below.
QPDF includes support for merging and splitting PDFs through the ability to copy objects from one PDF file into another and to manipulate the list of pages in a PDF file. The QPDF library also makes it possible for you to create PDF files from scratch. In this mode, you are responsible for supplying all the contents of the file, while the QPDF library takes care off all the syntactical representation of the objects, creation of cross references tables and, if you use them, object streams, encryption, linearization, and other syntactic details.
QPDF is not a PDF content creation library, a PDF viewer, or a program capable of converting PDF into other formats. In particular, QPDF knows nothing about the semantics of PDF content streams. If you are looking for something that can do that, you should look elsewhere. However, once you have a valid PDF file, QPDF can be used to transform that file in ways perhaps your original PDF creation can’t handle. For example, programs generate simple PDF files but can’t password-protect them, web-optimize them, or perform other transformations of that type.”
Source 1: http://qpdf.sourceforge.net/
Source 2: https://github.com/qpdf/qpdf
“Shadertoy is the first application to allow developers all over the globe to push pixels from code to screen using WebGL since 2009.
This website is the natural evolution of that original idea. On one hand, it has been rebuilt in order to provide the computer graphics developers and hobbyists with a great platform to prototype, experiment, teach, learn, inspire and share their creations with the community. On the other, the expressiveness of the shaders has arisen by allowing different types of inputs such as video, webcam or sound.”

Source 1: https://www.shadertoy.com
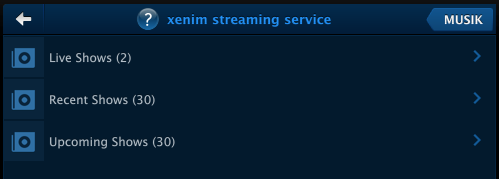
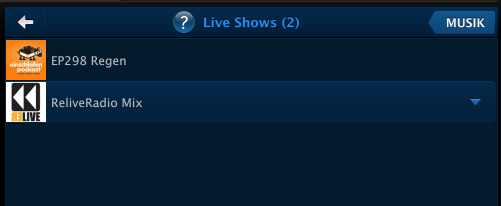
I am a frequent podcast live-stream listener. And being that I am enjoying the awesome service called xenim streaming network.
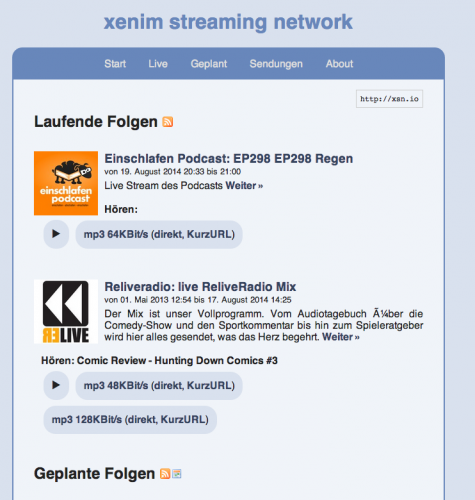
Any Podcast producer can join the xsn and with that can live-stream his own Podcast while recording. It’s CDN is based on voluntarily provided resources and pretty rock-solid as far as my experience with it goes.
Since I am a frequent user of this – and I’ve got that gorgeous SONOS hardware scattered around my house – I thought I need to have that service integrated into my SONOS set.
The SONOS system knows the concept of “Music Services”. There are quite a lot of them but xsn is missing. But SONOS is awesome and they got an API!
Unfortunately the API documentation is hidden behind a NDA wall so that would be a no-go. What’s not hidden is what the SONOS controllers have to discuss with all the existing services. Most of the time these do not use HTTPS so we’re free to listen to the chatters. I did just that and was able, for the sake of interoperability, to reverse engineer the SONOS SMAPI as far as it is necessary to make my little xsn Music Service work.
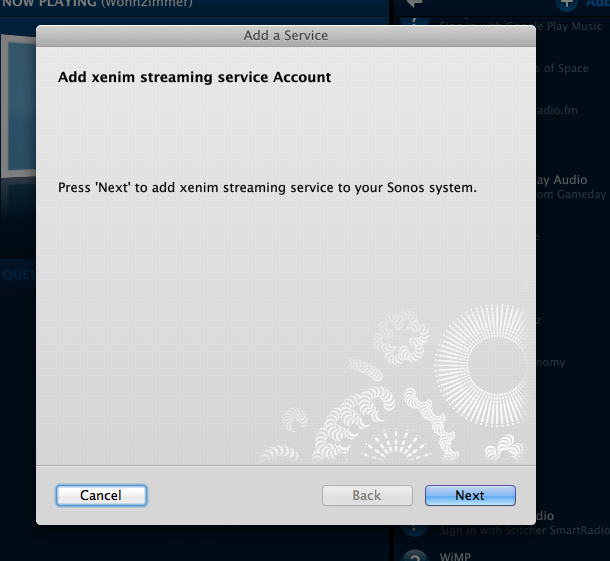
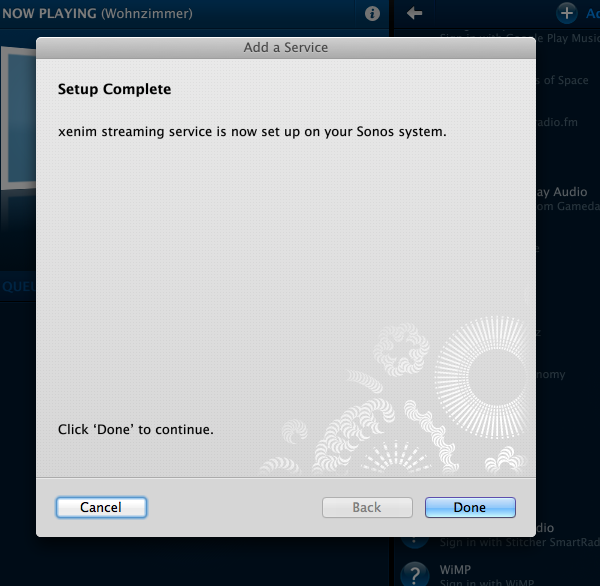
As usual you can get the source-code distributed freely through Github. If you’re not into that sort of compiling and programming things, you are invited to use my free-of-charge provided service. To set it up on your home SONOS just follow these simple steps:
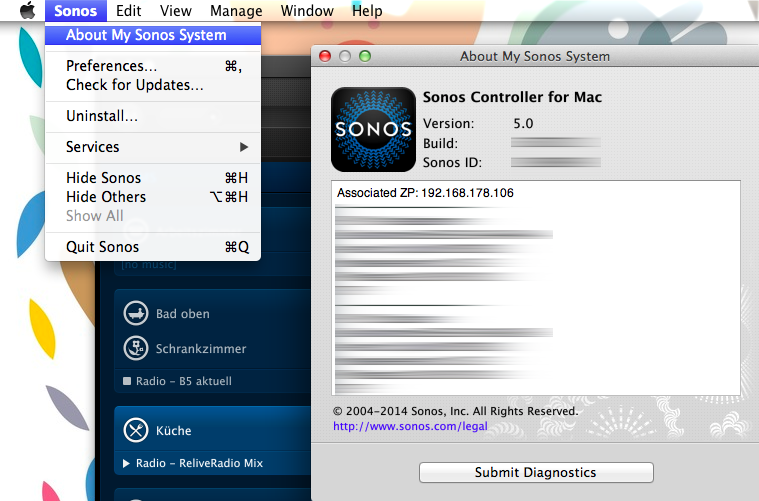
Step 1: Start your SONOS Controller Application and find out the IP address of your SONOS.
Click on “About My Sonos System” and check the IP address written next to the “Associated ZP”.
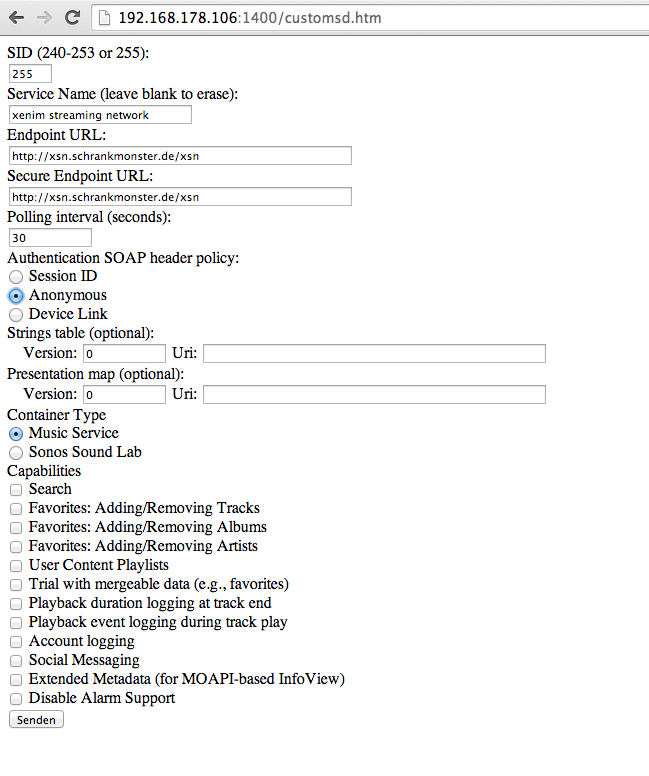
Step 2: Add the xsn Music Service.
By opening a browser window and browsing to: http://<your-associated-zp-ip>:1400/customsd.htm
When you’re there – fill out the fields as below. The SID is either 255, or if you used that previously, something between 240-253. The service name is “xenim streaming network”. The Endpoint URL and Secure Endpoint URL both are http://xsn.schrankmonster.de/xsn
Set the Polling interval to 30 seconds. Click on the Anonymous Authentication SOAP header policy and you’re good to go. Click on “send” to finish.
Step 3: Add the new Music Service to your SONOS Controller.
Click on “Add Music Services” and click through until you see “xenim streaming network”. Add the service and you’re set!
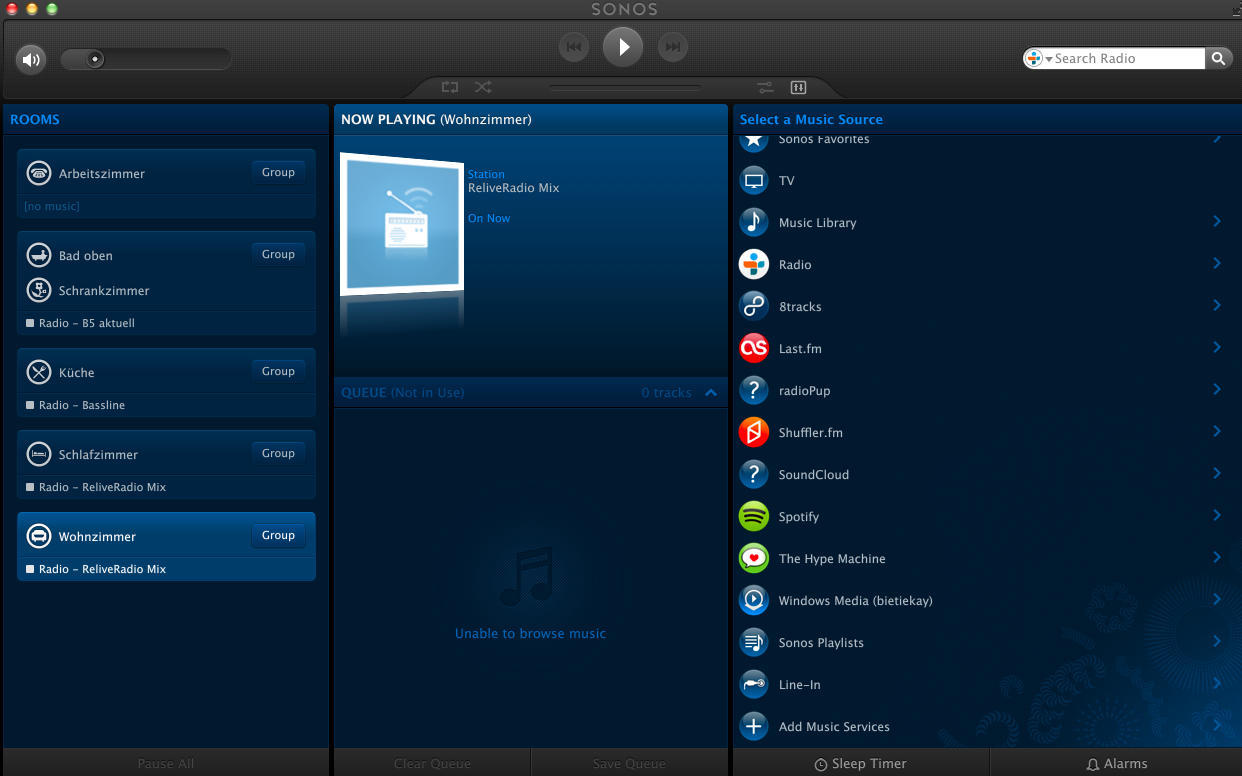
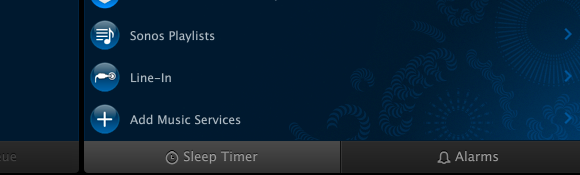
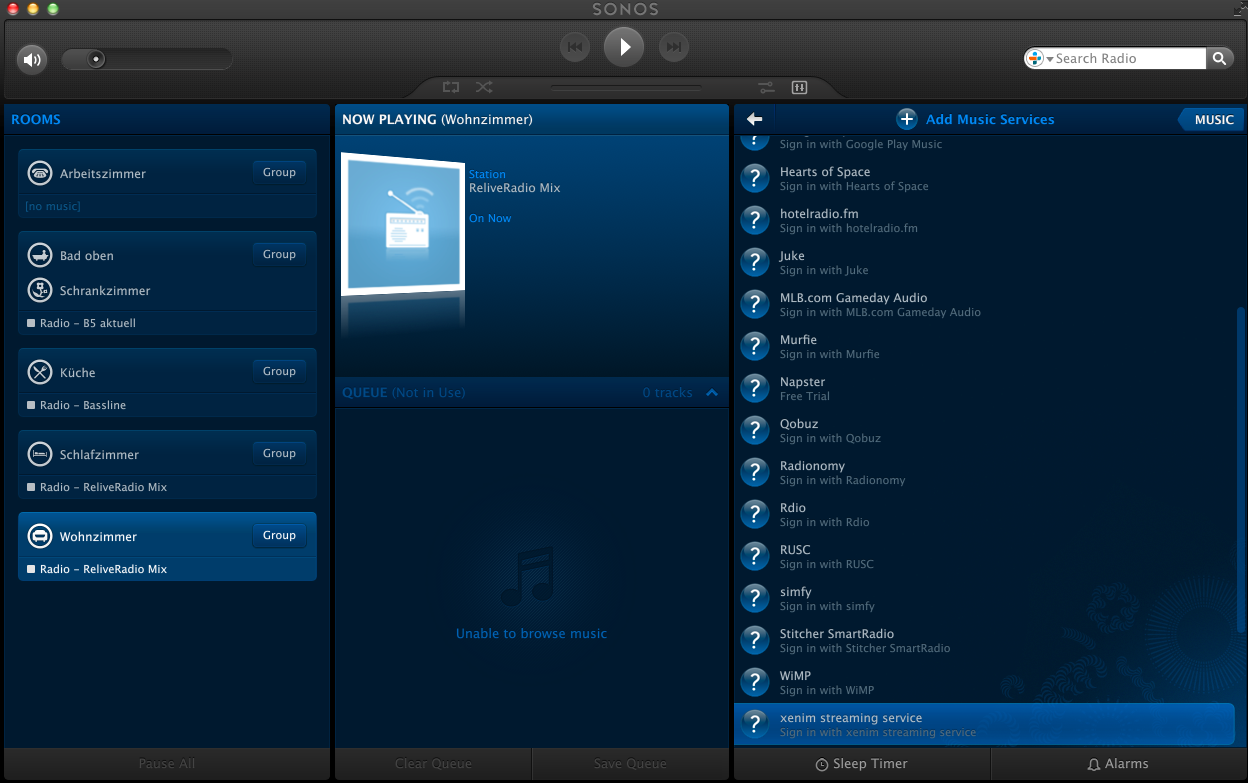
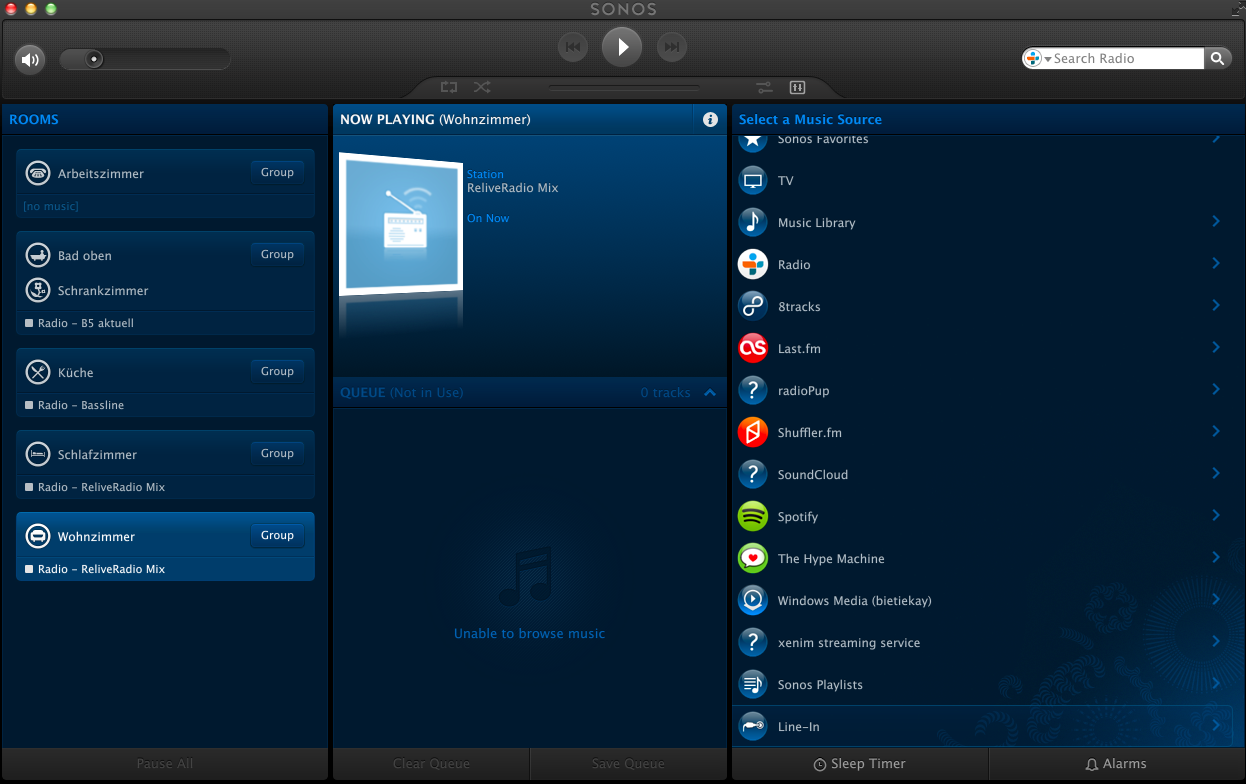
p.s.: It’s normal that the service icon is a question mark.
Step 4: Enjoy Live Podcasts!
Source 1: https://github.com/bietiekay/sonos-xsn-service
Source 2: http://streams.xenim.org/
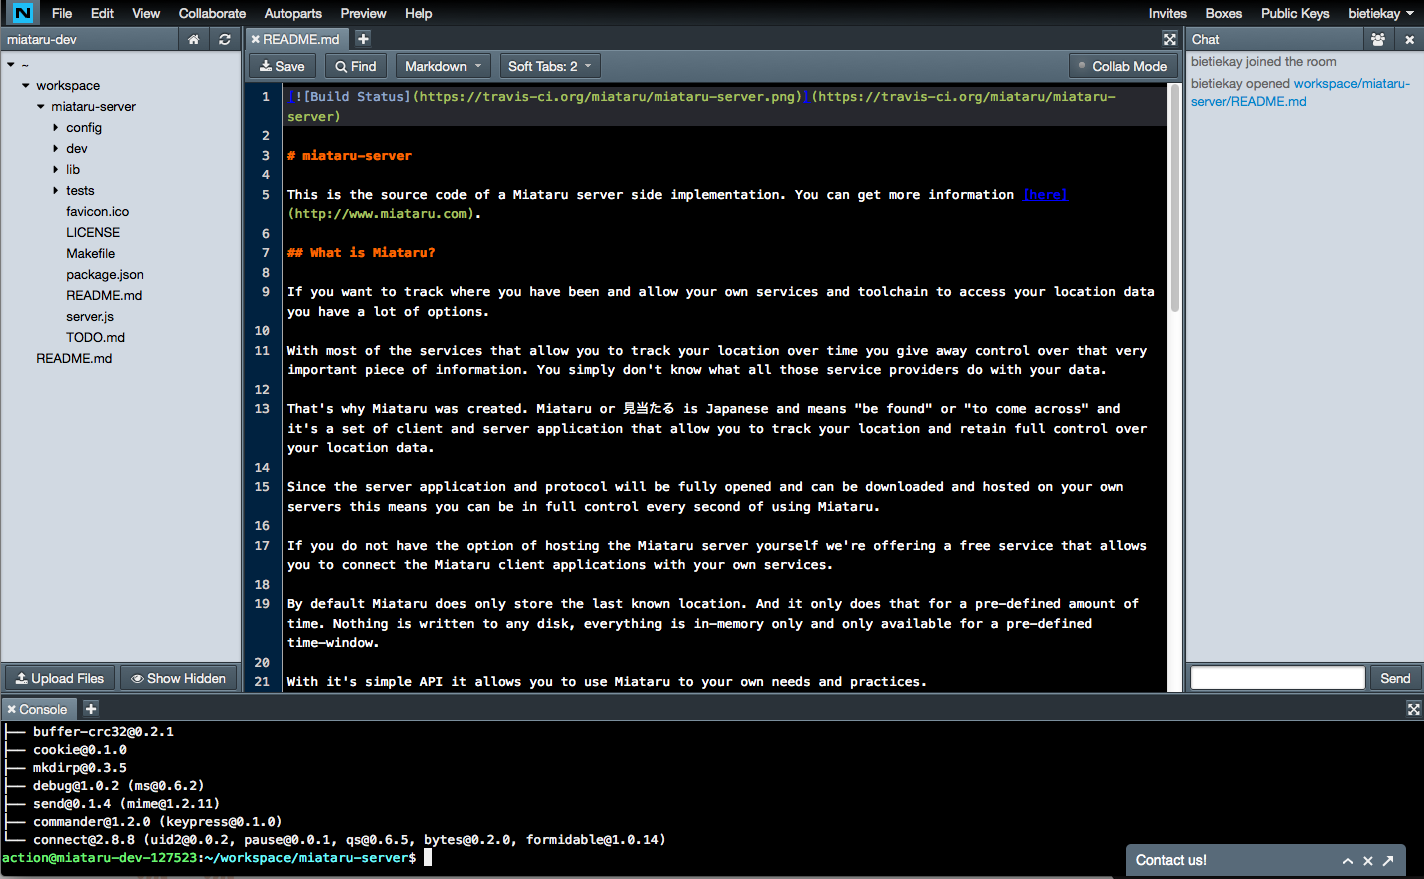
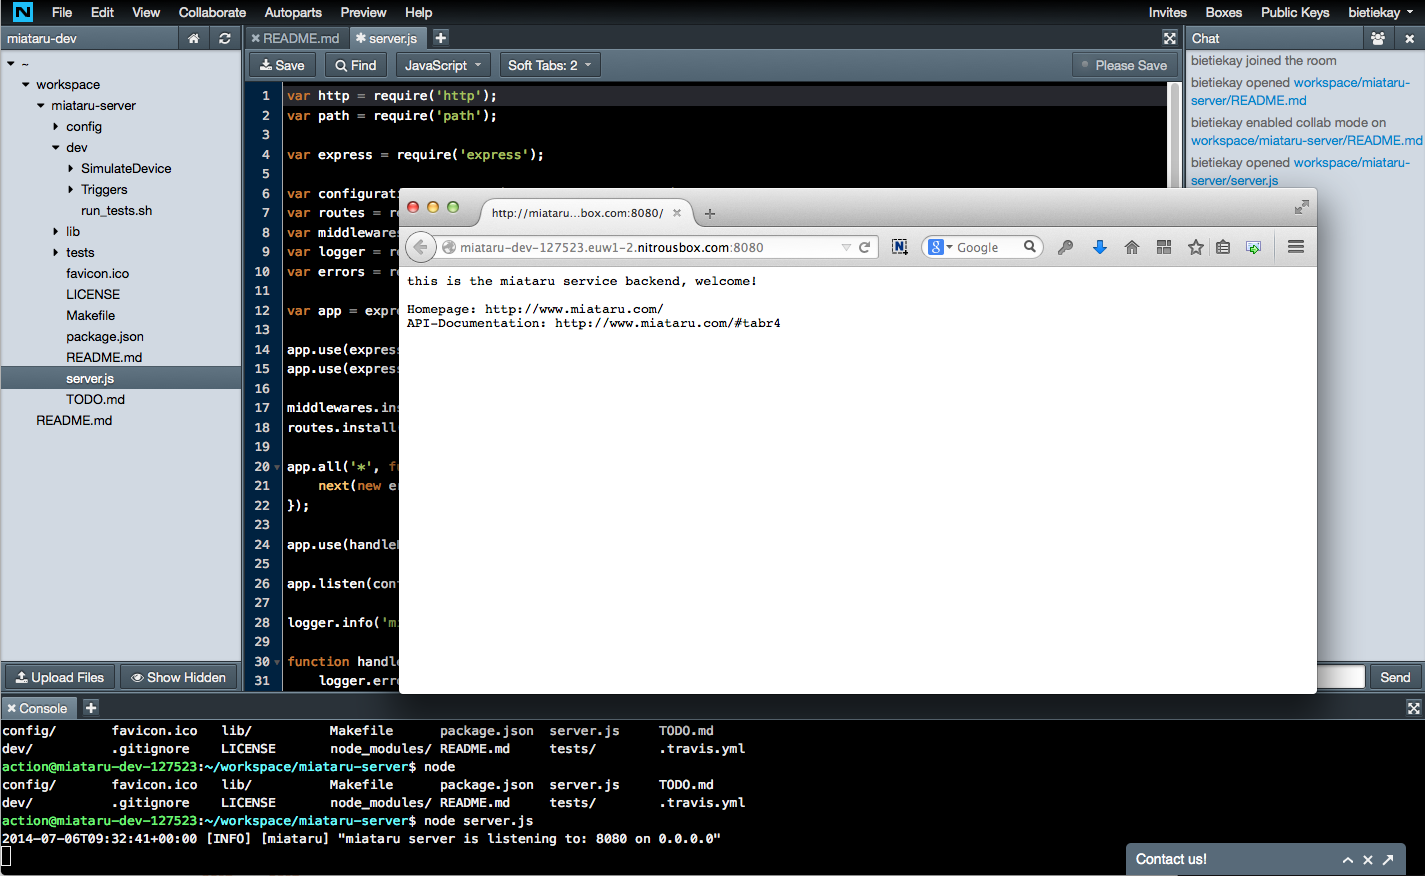
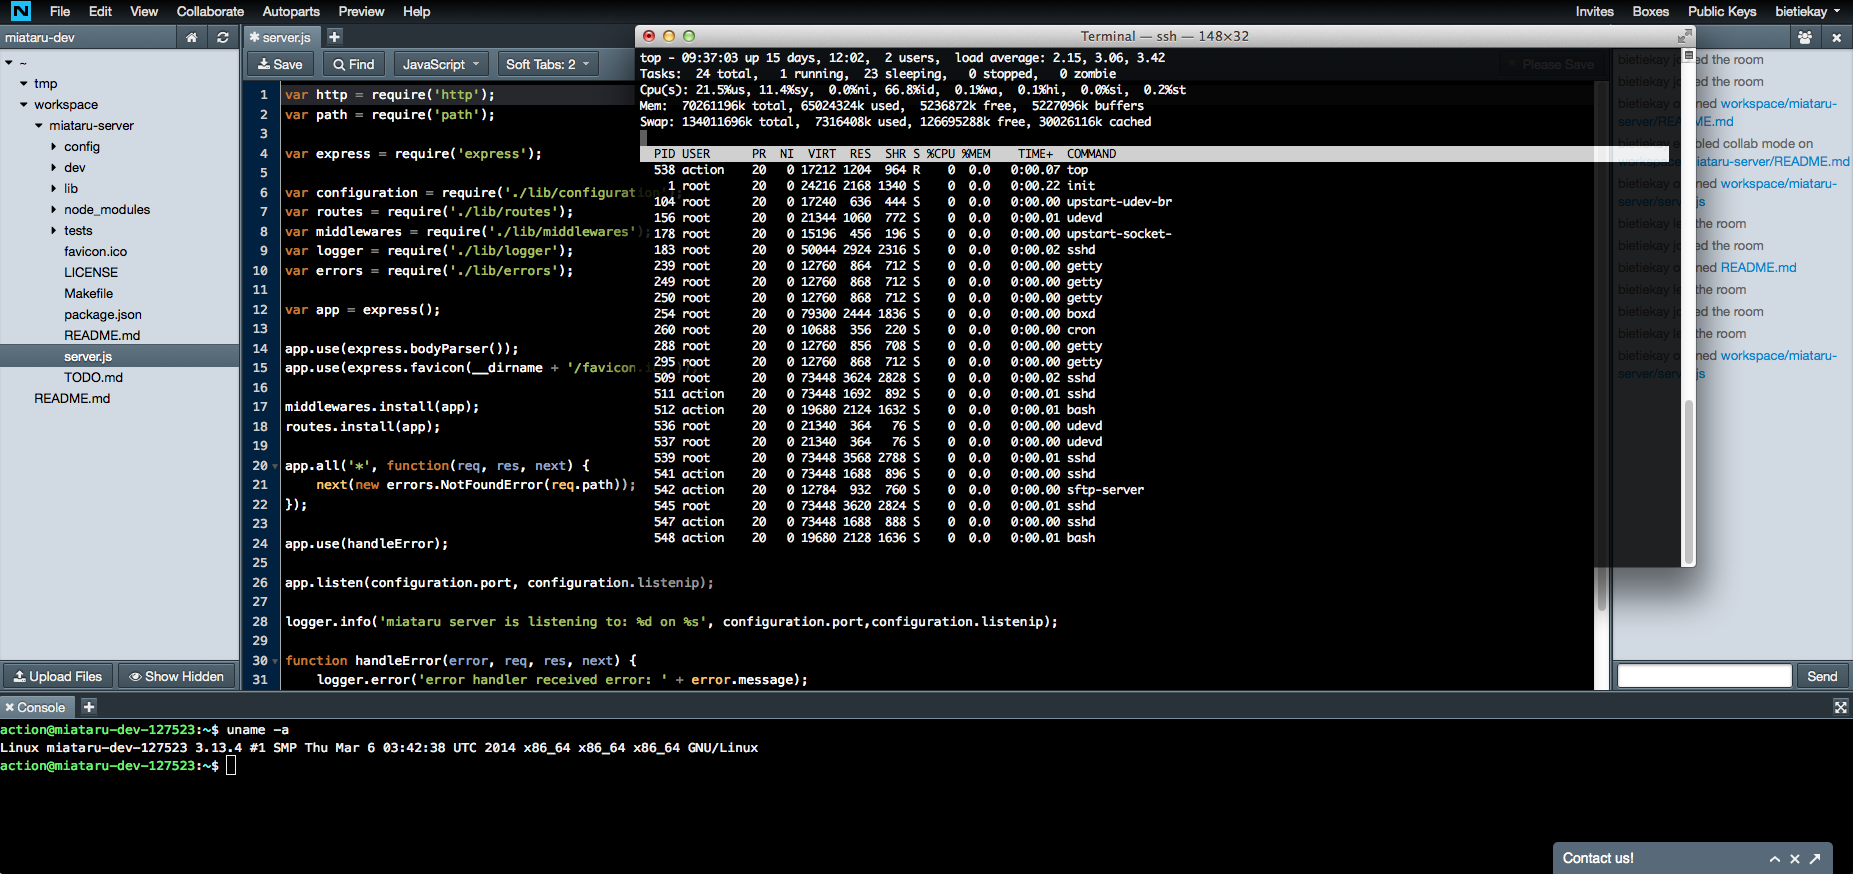
Since a user of miataru asked about how to set-up your own miataru server I’ve decided to make a short screen recording of how you can do it with the help of Nitrous.IO:
[youtube]https://www.youtube.com/watch?v=TOgmh7EBEIk[/youtube]
So it happened to one of the VU+ Duos in the house. After a clean shutdown it did not boot up as expected but instead just showed the red light. It still blinked on remote keypresses and the harddisk spun up. Nothing else happened with it.
So it was bricked.
Reading the forums about that pointed to a capacitor on the board that quite regularly seems to fail. C807 is it’s name and it’s located near the Harddisk and the power-supply part of the VU+ Duo.
When I looked at the capacitor it did not seem to be faulty or anything. So without the right tools to measure I’ve decided to just give it a shot and replace the original 16V 220uF 85 degrees celsius capacitor with a 105 degrees celsius 16V 330uF one.
In my case I’ve taken out the board, to have a little bit of extra space, and cut of the old capacitor. Desoldering would be nicer looking but, well …
Replacing it on the left-over pins of the old capacitor was a matter of seconds.
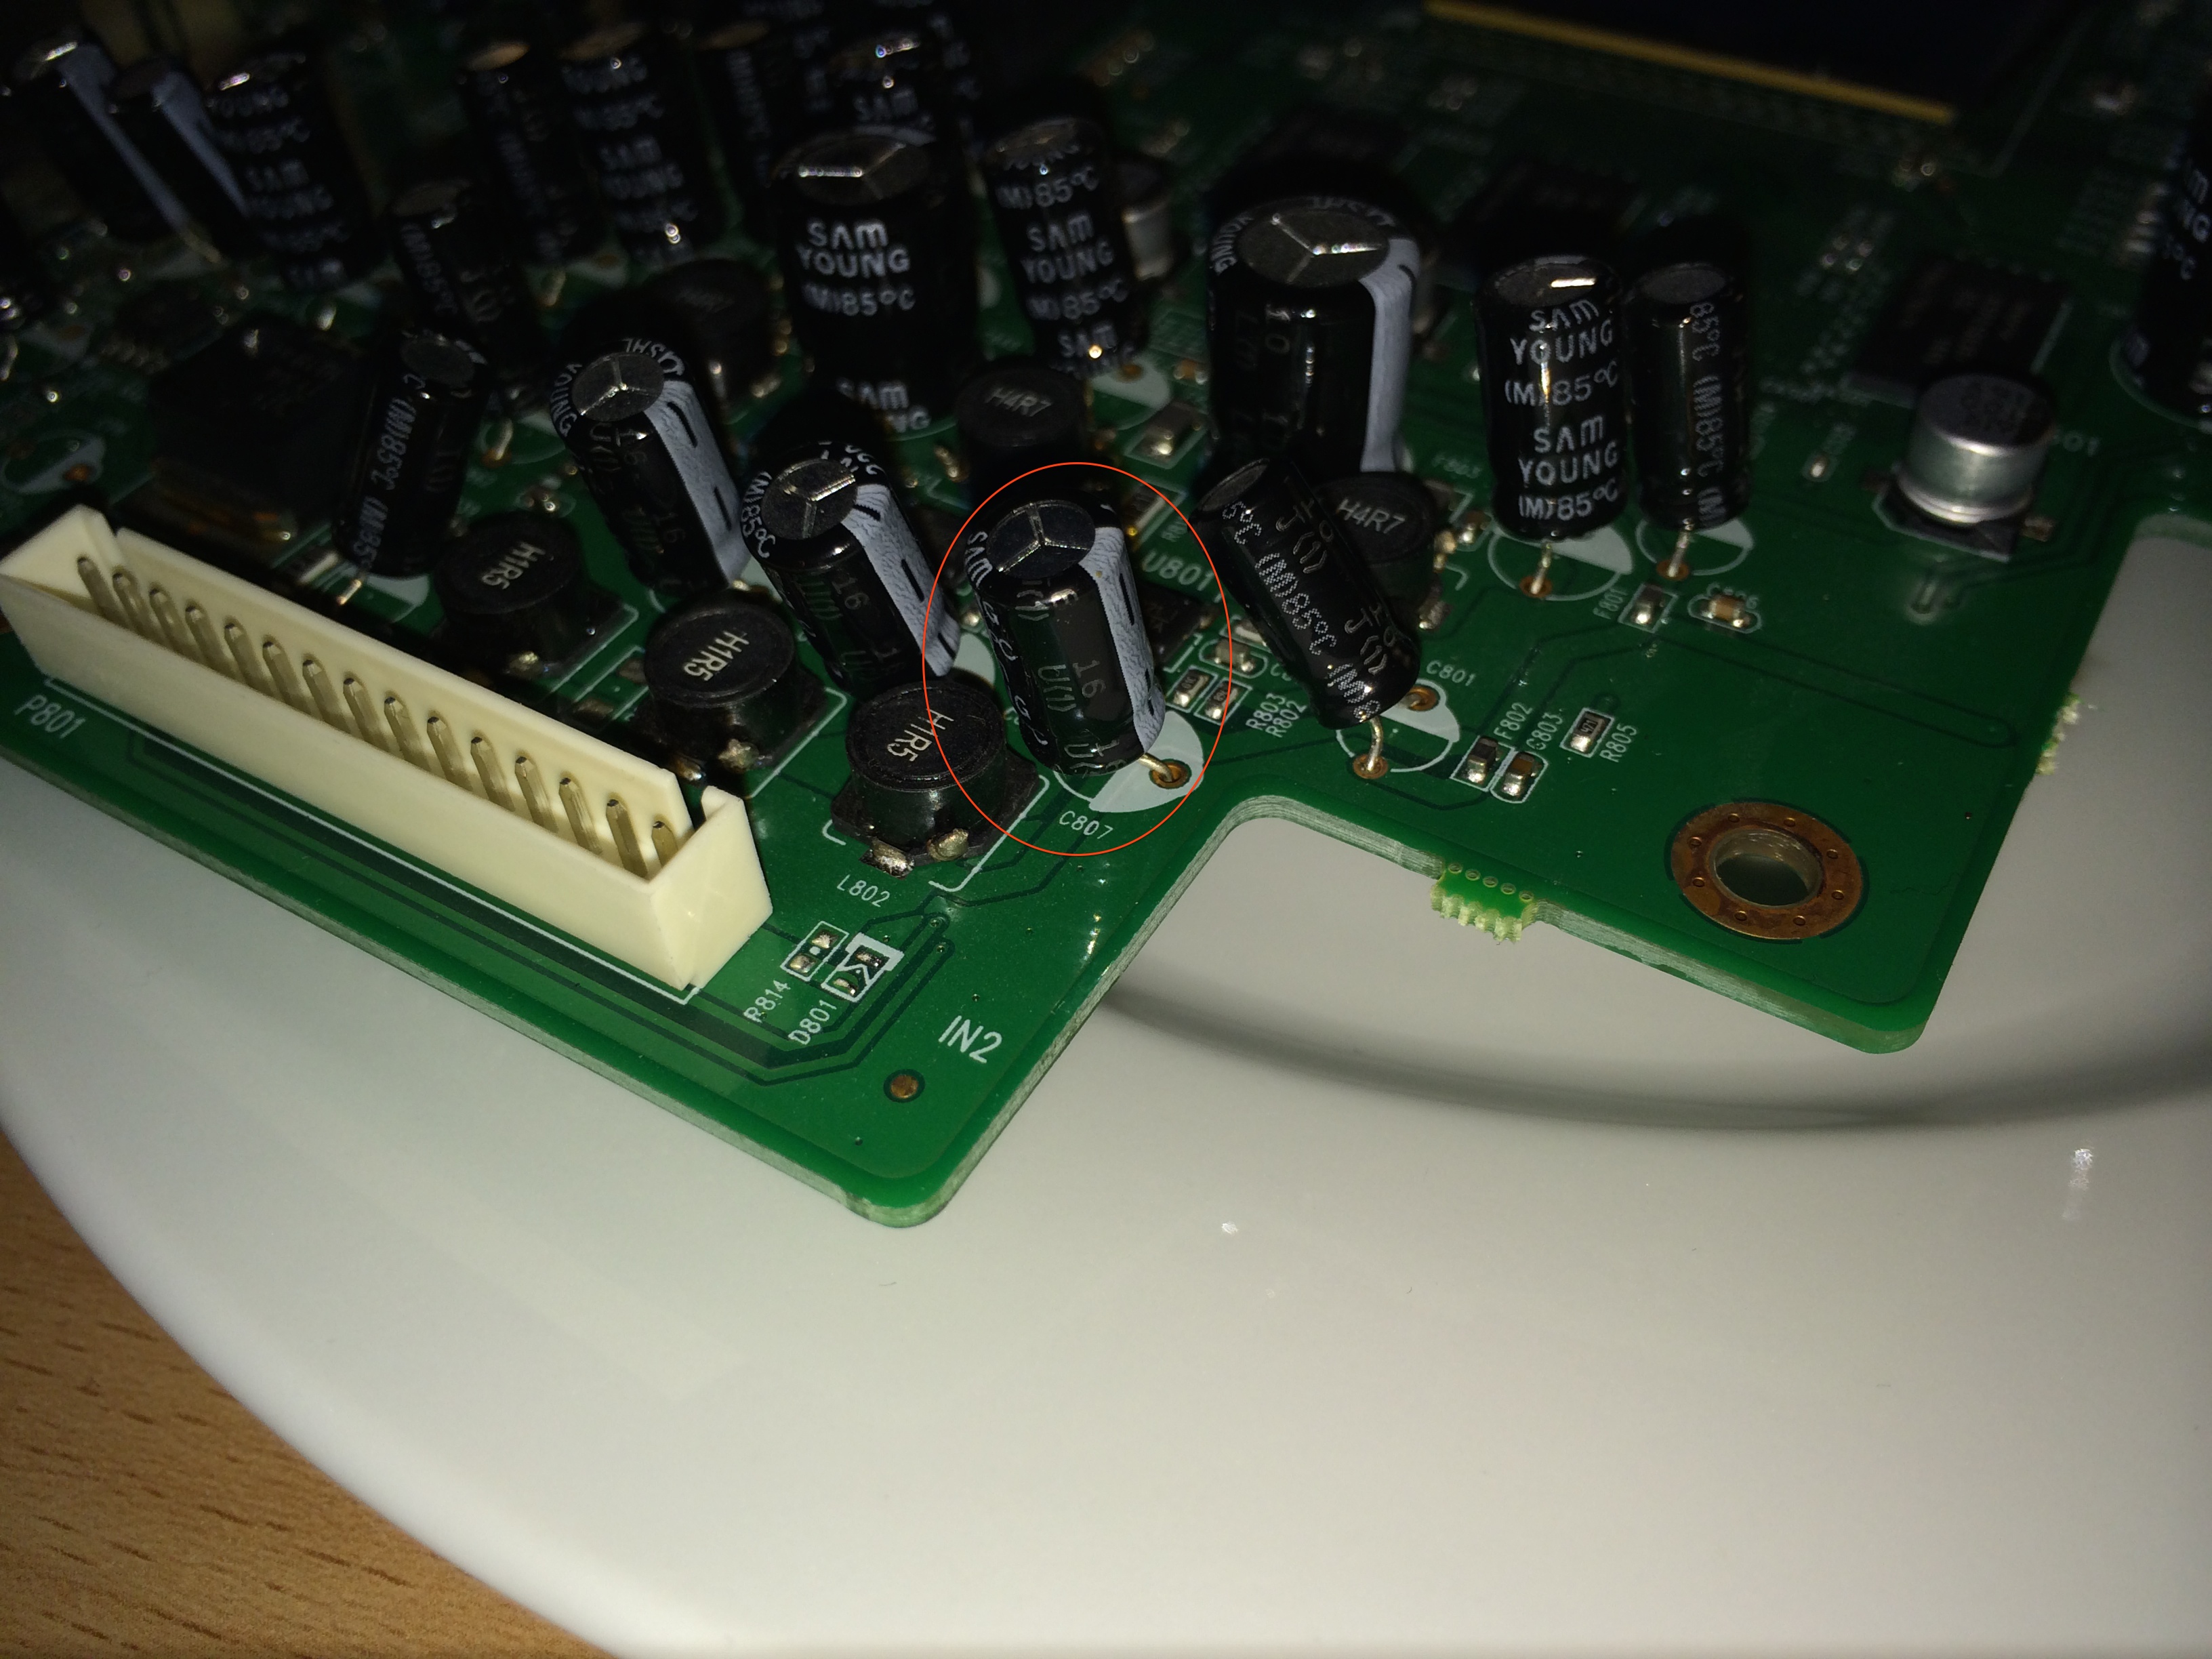
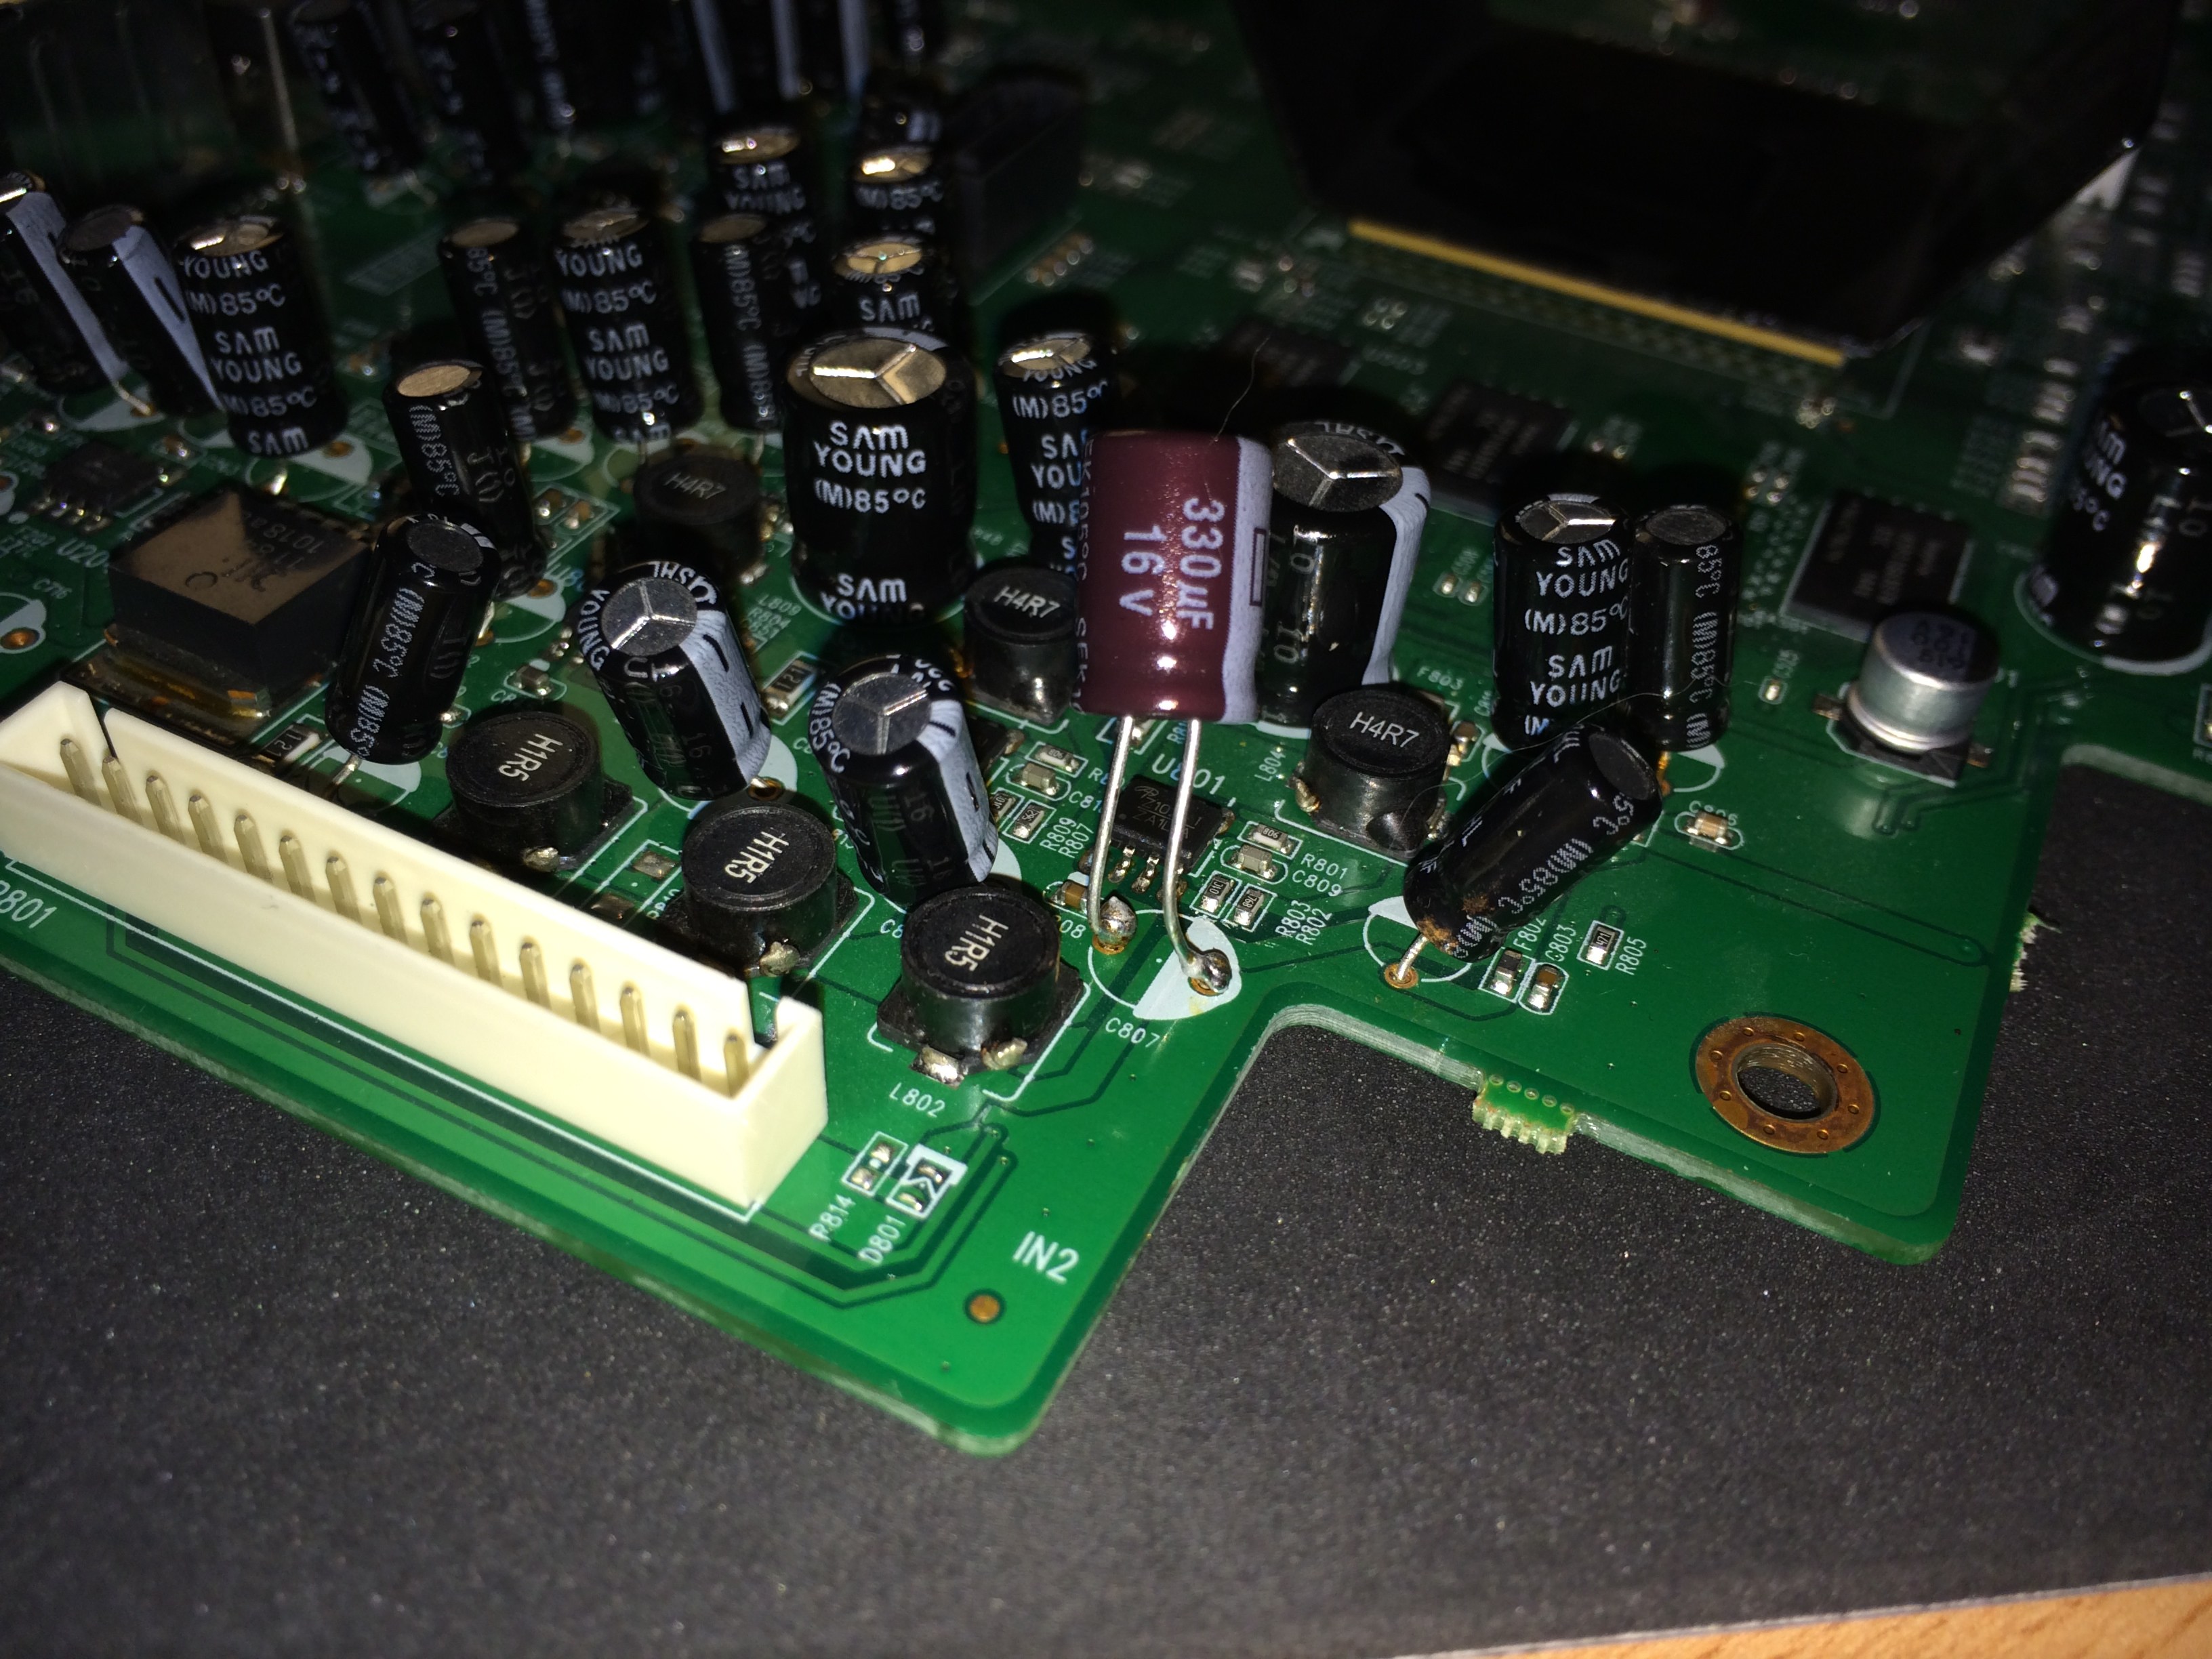
After putting the board back in, the VU+ Duo powered up and booted as new. Brilliant!
“Odd patterns of I/O latency can be hidden by line graphs and summary statistics, and revealed by histograms and heat maps. In my previous post I showed my Linux iosnoop tool, which can trace block device I/O along with timestamps and latency. This information can be visualized, revealing any odd patterns.”
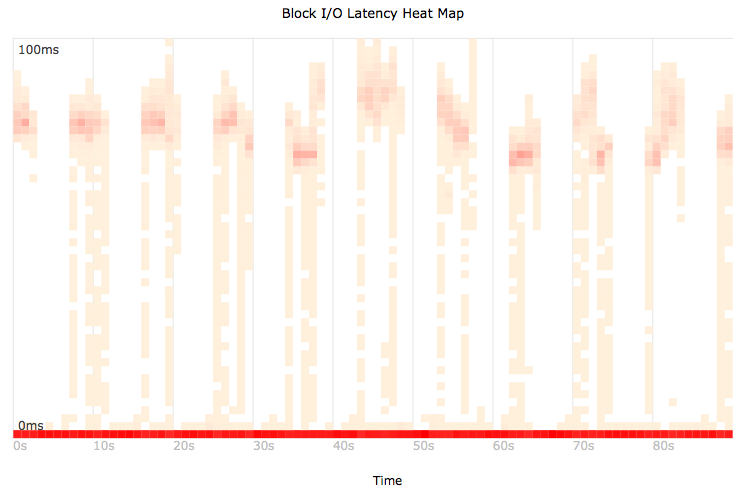
Source: http://www.brendangregg.com/blog/2014-07-23/linux-iosnoop-latency-heat-maps.html

“Knight Rider ist wieder da! Nach Jahren des bangen Wartens zeigt RTL endlich wieder den jungen David Hasselhoff, der mit seinem “Wunderauto” auf große Verbrecherjagd geht. Knight Rider war Kult, Knight Rider ist Kult, und Knight Rider mit Bier ist Oberkult! Angeklebte Armaturen, deren Knöpfe beinahe beliebig in Farbe, Beschriftung und Anordnung variieren, während der Fahrt wechselnde Lenkräder, Stuntfahrer mit krasskranken Clownsfrisuren sowie viele, viele, WIRKLICH viele Logik-, Dreh-, oder sonstwie geartete Fehler laden zur spaßig alkoholgetränkten Analyse ein. Die dümmsten Drehpannen, die peinlichsten Hasselhoff-Anmachen, die unauffälligsten Tarnsack-Autofahrer.”
Source: http://www.regelt.org/knightrider/sprittforfun/knightrider.html
“The Infinadeck is the world’s first affordable omnidirectional treadmill that is designed to work both in augmented and virtual reality. This revolutionary device provides the missing link making it now possible to have a true Holodeck experience. You might say, “Reality just got bigger”.”
[youtube]https://www.youtube.com/watch?v=GoVAOfU8UJQ[/youtube]
Source: http://www.infinadeck.com/
“Nitrous is a backend development platform which helps software developers save time by cutting out the repetitive parts of creating development environments and automating them.
Once you create your first development environment, there are many features which will make development easier.”

So what you’re getting is:
Here are some screenshots to get you a feel for it:
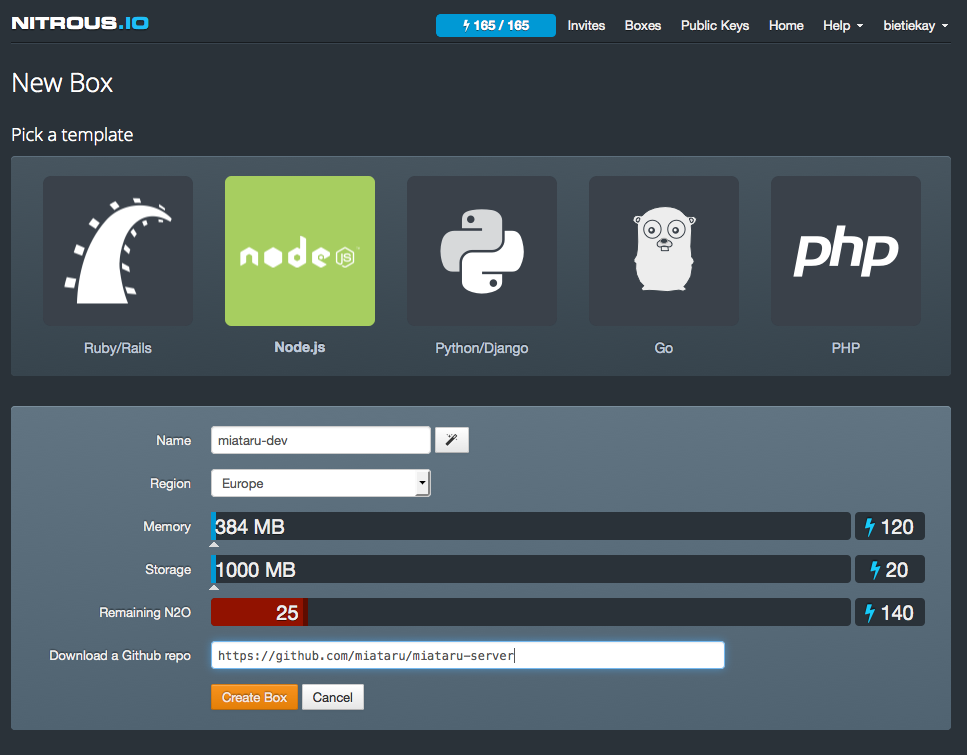
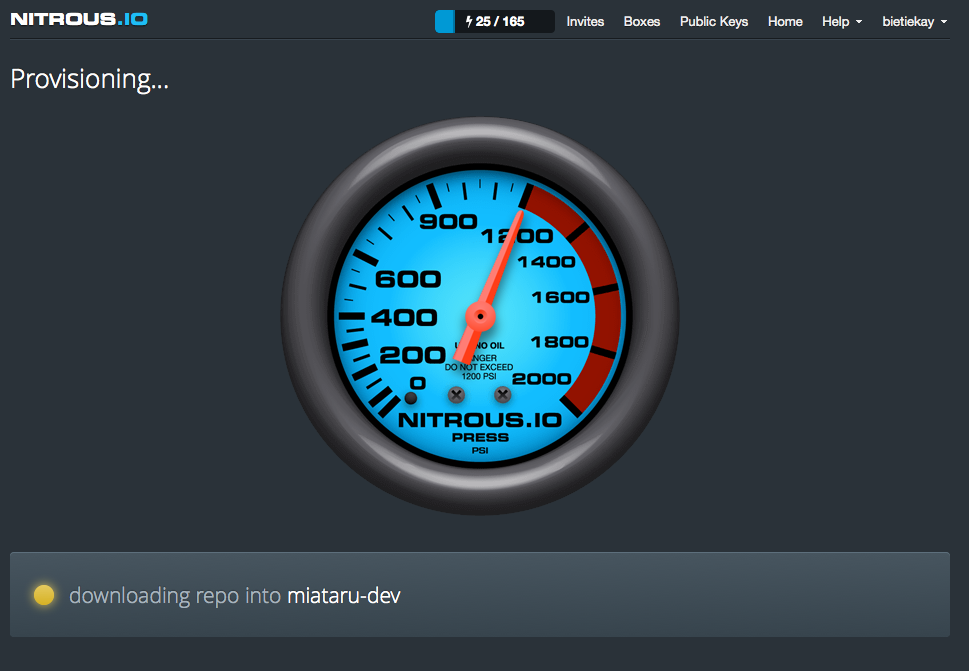
Source: https://www.nitrous.io/
If you ever experienced a missmatch between the performance you expected from a server or application running on Linux you probably started to debug your way into it why the applications performance is not on the expected levels.
With Linux being very mature you get an enormous amounts of helpers and interfaces to debug the performance aspects of the operating system and the applications.
Want to see proof? Here – a map of almost all the thingies and interfaces you got: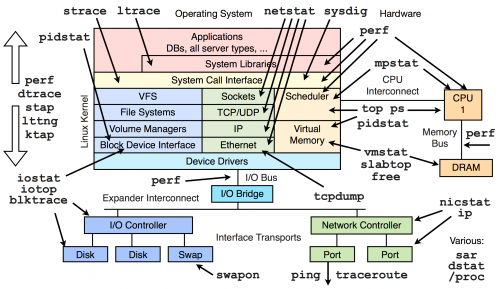
Thankfully Brendan Gregg put together a page with videos and further links to drill into those interfaces and methods above.
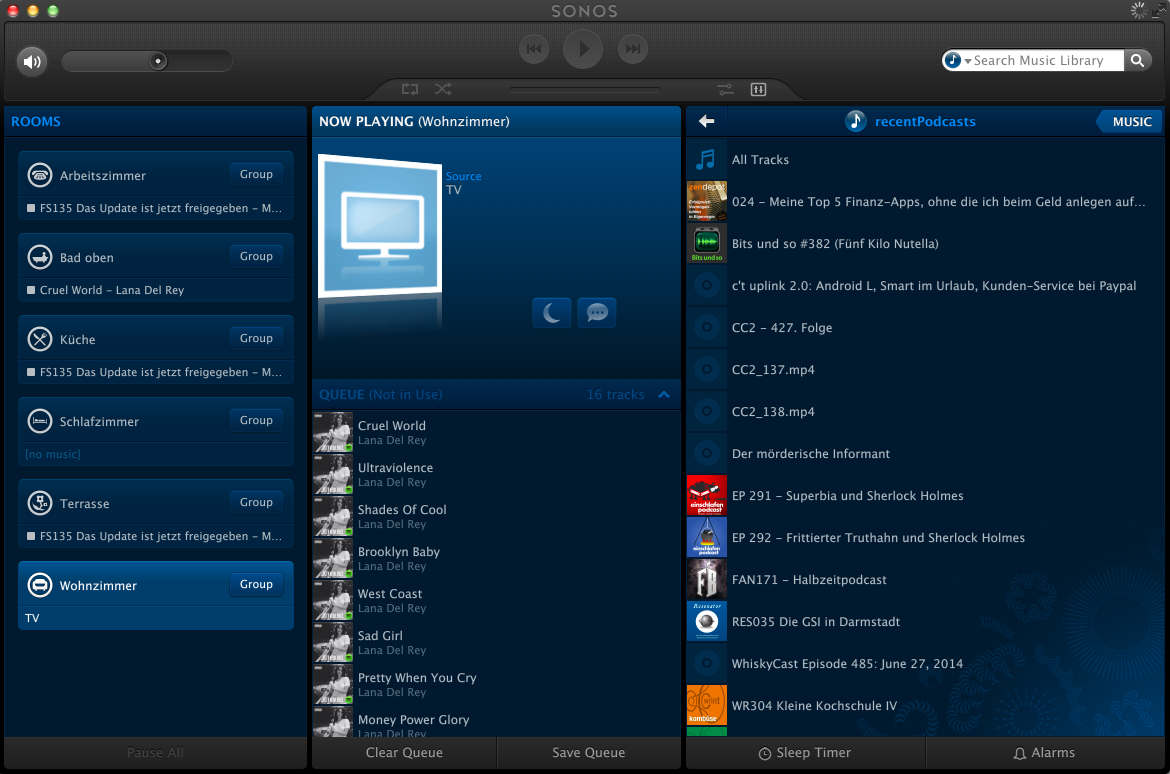
I am using an external podcast download tool to stay updated on all podcasts I subscribed to. For this purpose SubSonic is a good choice – actually for a lot more also.
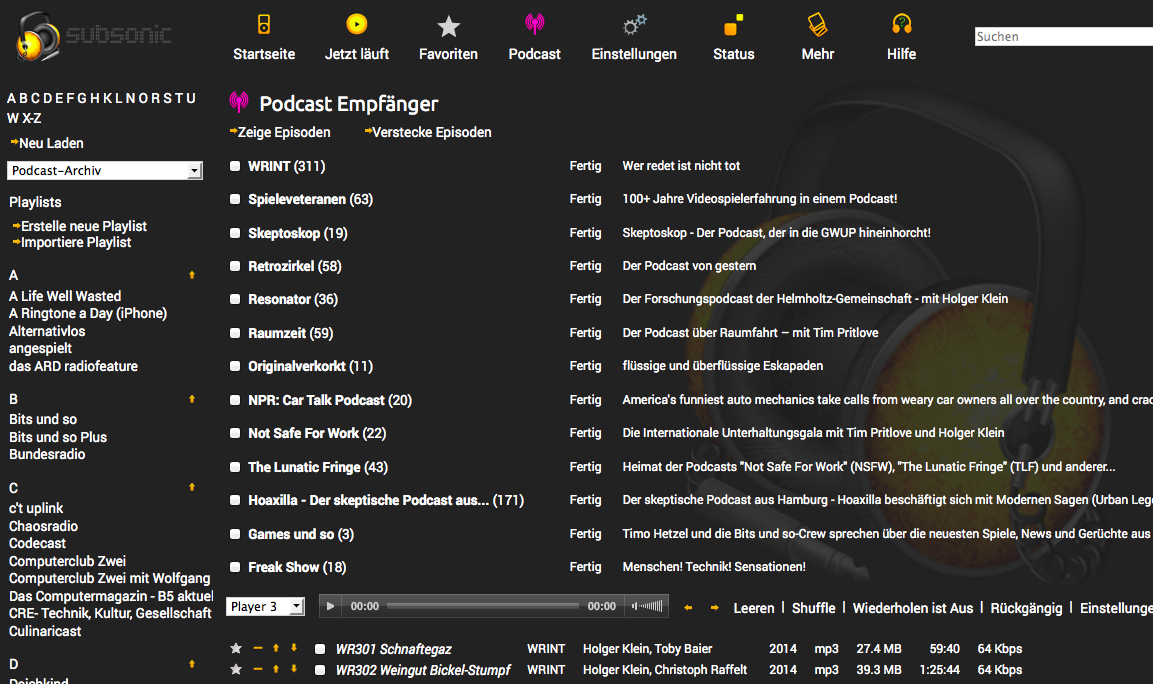
One of the quirks of the SONOS products is that Podcasts are not really well supported. In fact there is no support at all.
So I wrote a tool that extends the SONOS players with the functionality to “remember” play positions within audiobooks and podcasts. Now what’s left to properly have podcasts supported is a view of the most recently updated podcasts. Wouldn’t it be nice to have a “Folder View” in the SONOS controller of what’s new across all the different podcasts you are subscribed to?
Now here’s the trick:
Use a small script on any RaspberryPi in the house to dynamically create hardlinks to the podcasts files in a “Recently Updated Podcasts” folder.
The script is something like this:
find /where-your-podcasts-are/ -type f -printf ‘%TY-%Tm-%Td %TT %p\n’ | sort | tail -n 25 | cut -c 32- | sed -e “s/^/ln \”/” -e “s/$/\”/” -e “s/$/ \”\/recentPodcasts\/\”/” | sh
This short line will go through all folders and subfolders in /where-your-podcasts-are/ and then create Hardlinks in /recentPodcasts to the most recent 25 files.
That way, and when /recentPodcasts/ is made accessible to your SONOS controllers, you’ll have something like this:
Source 1: http://www.subsonic.org
Source 2: play position bookmarker
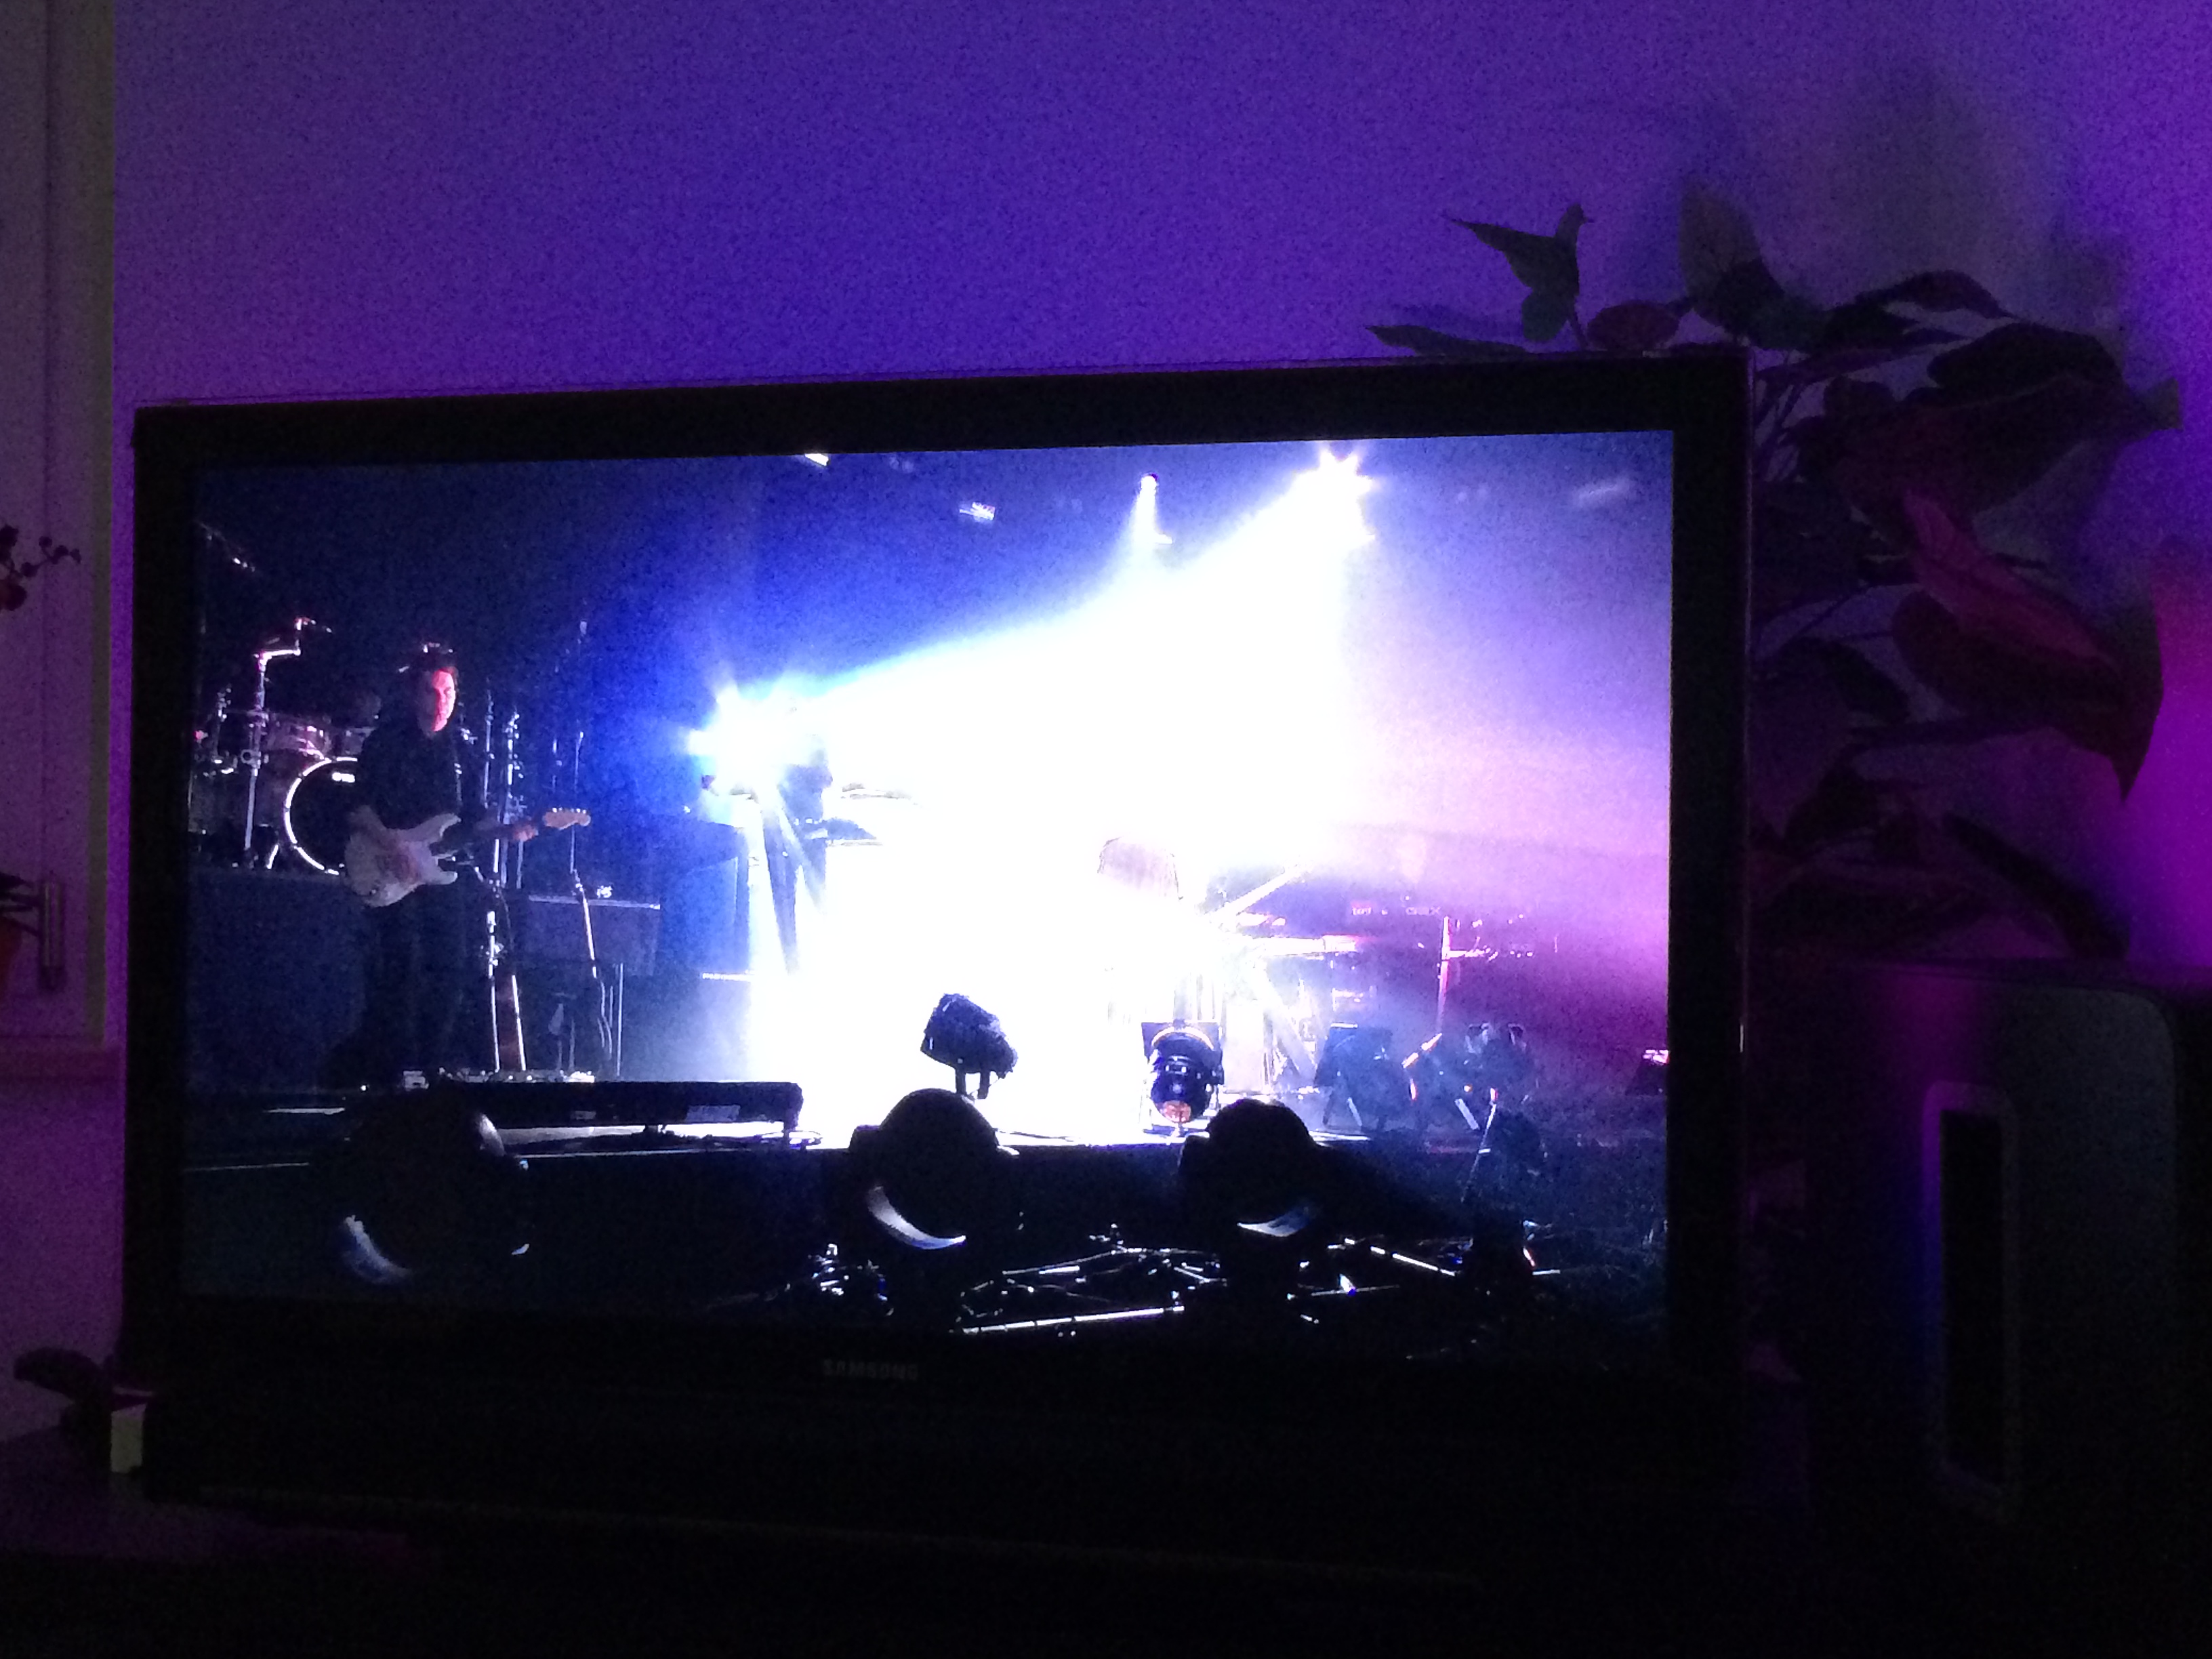
After setting up Boblight on two TVs in the house – one with 50 and one with 100 LEDs – I’ve used it for the last 5 months on a daily basis almost.
First of all now every screen that does not come with “added color-context” on the wall seems off. It feels like something is missing. Second of all it has made watching movies in a dark room much more enjoyable.
The only concerning factor of the past months was that the RaspberryPi does not come with a lot of computational horse-power and thus it has been operating at it’s limits all the time. With 95-99% CPU usage there’s not a lot of headroom for unexpected bitrate spikes and what-have-you.
So from time to time the Pis where struggling. With 10% CPU usage for the 50 LEDs and 19% CPU usage for the 100 LEDs set-up there was just not enough CPU power for some movies or TV streams in Full-HD.
So since even overclocking only slightly improved the problem of Boblight using up the precious CPU cycles for a fancy light-show I started looking around for alternatives.
“Hyperion is an opensource ‘AmbiLight’ implementation controlled using the RaspBerry Pi running Raspbmc. The main features of Hyperion are:
More information can be found on the wiki or the Hyperion topic on the Raspbmc forum.”
Especially the Low CPU load did raise interest in my side.
Setting Hyperion up is easy if you just follow the very straight-forward Installation Guide. On Raspbmc the set-up took me 2 minutes at most.
If you got everything set-up on the Pi you need to generate a configuration file. It’s a nice JSON formatted config file that you do not need to create on your own – Hyperion has a nice configuration tool. Hypercon:
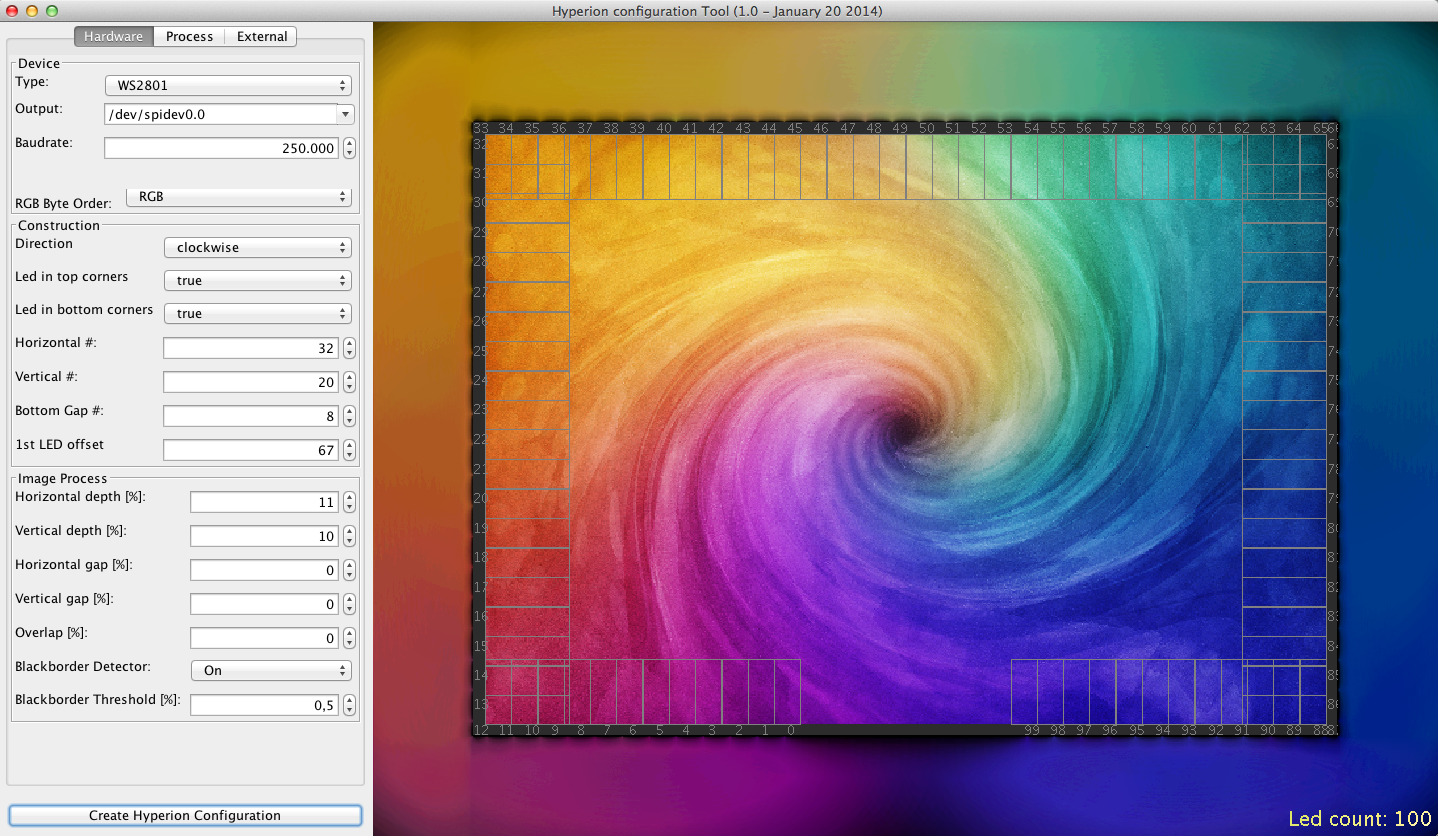
So after 2 more minutes the whole thing was set-up and running. Another 15 minutes of tweaking here and there and Hyperion replaced Boblight entirely.
What have I found so far?
All in all Hyperion is a recommended replacement for boblight. I would not want to switch back.
Source 1: Setting up Boblight
Source 2: https://github.com/tvdzwan/hyperion/wiki/Installation
When traveling you might find yourself in the situation that you get a new SIM card into your iPhone and it’ll start and do it’s automatic magic for you. And eventually you well end up with the right provider settings by default.
But there are some cases when it picks the wrong provider settings. Like in my case. It picked NTT docomo in Japan with the default NTT docomo settings. In my case I was using a reseller for NTT (as described here) and that demanded different provider settings to work.
Unfortunately in all it’s wisdom the iPhone did not allow me to set the carrier settings. It just displayed the “Automatic” choice. So I went to the APN Changer website, entered the settings and installed a custom provider setting to my device. This works without any Jailbreak with iPhones without SIM Lock.
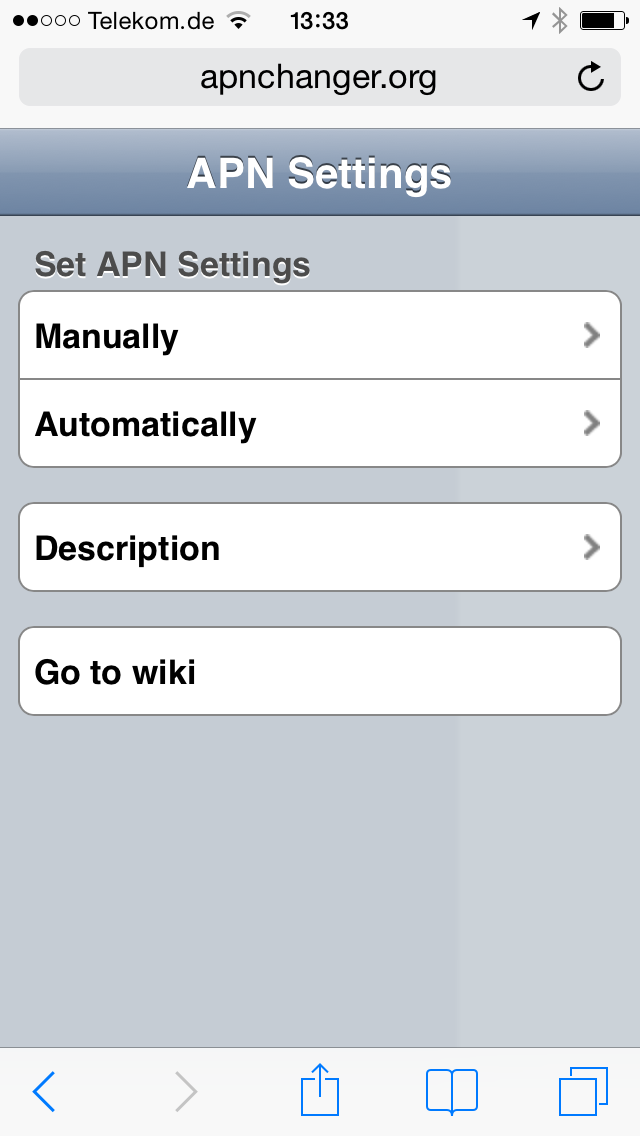
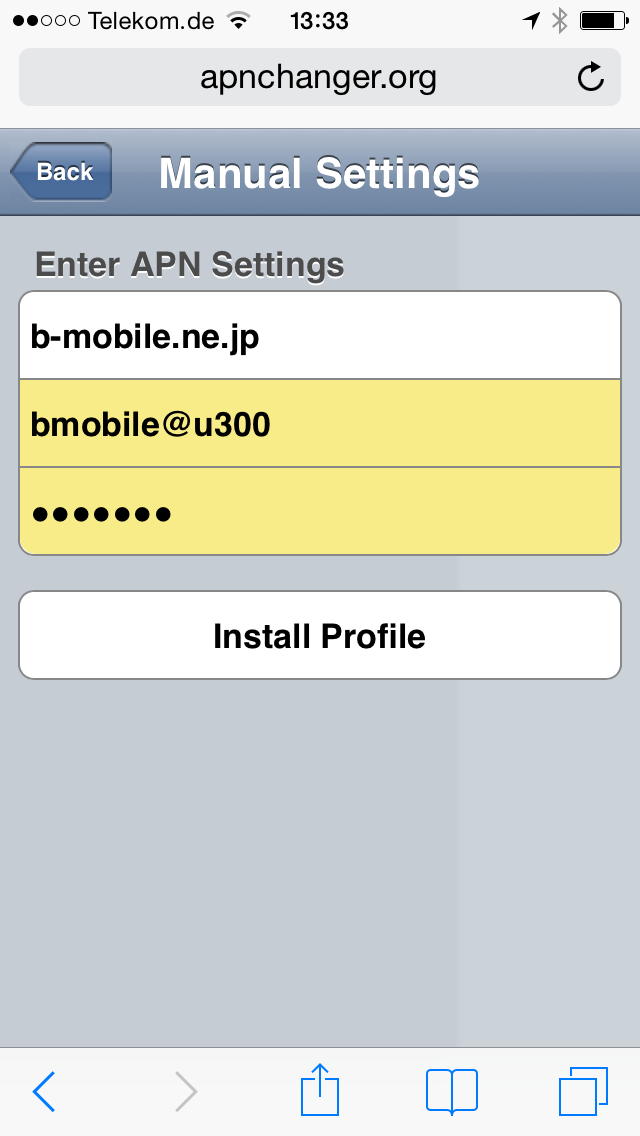

Source: m.apnchanger.org
Airplay allows you to conveniently play music and videos over the air from your iOS or Mac OS X devices on remote speakers.
Since we just recently “migrated” almost all audio equipment in the house to SONOS multi-room audio we were missing a bit the convenience of just pushing a button on the iPad or iPhones to stream audio from those devices inside the household.
To retrofit the Airplay functionality there are two options I know of:
1: Get Airplay compatible hardware and connect it to a SONOS Input.
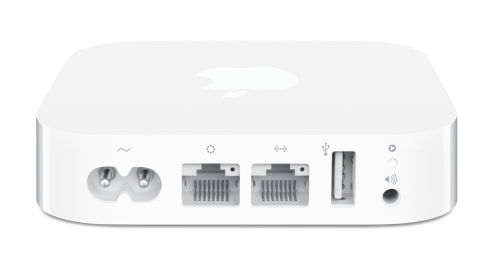 You have to get Airplay hardware (like the Airport Express/Extreme,…) and attach it physically to one of the inputs of your SONOS Set-Up. Typically you will need a SONOS Play:5 which has an analog input jack.

2: Set-Up a RaspberryPi with NodeJS + AirSonos as a software-only solution
You will need a stock RaspberryPi online in your home network. Of course this can run on virtually any other device or hardware that can run NodeJS. For the Pi setting it up is a fairly straight-forward process:
You start with a vanilla Raspbian Image. Update everything with:
sudo apt-get update
sudo apt-get upgrade
Then install NodeJS according to this short tutorial. To set-up the AirSonos software you will need to install additional avahi software. Especially this was needed for my install:
sudo apt-get install git-all libavahi-compat-libdnssd-dev
You then need to get the AirSonos software:
sudo npm install airsonos -g
After some minutes of wait time and hard work by the Pi you will be able to start AirSonos.
sudo airsonos
And it’ll come up with an enumeration of all active rooms.
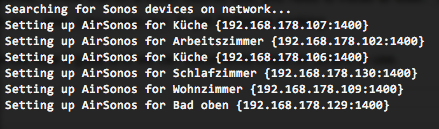
And on all your devices it’ll show up like this:
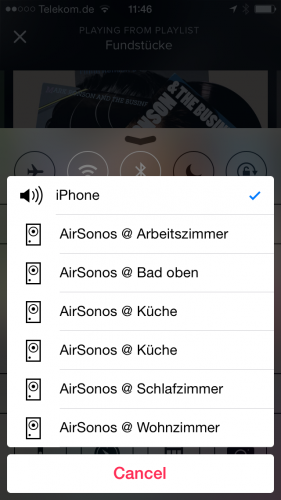
and
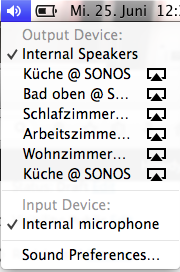
Being in Tokyo as a visitor brings a lot of challenges. Since you gotta use the public transport offers to get from A to B. Now we had the same challenge this May and this is how we tried to solve it.

Problem: How do you know which train lines you take and where they are?
Solution: Use Google Maps (you need mobile internet access!) to find your route
The public transportation feature of Google Maps works like a charm. It’s accurate as it can be and offers even walking instructions to get to the right platform or train station.
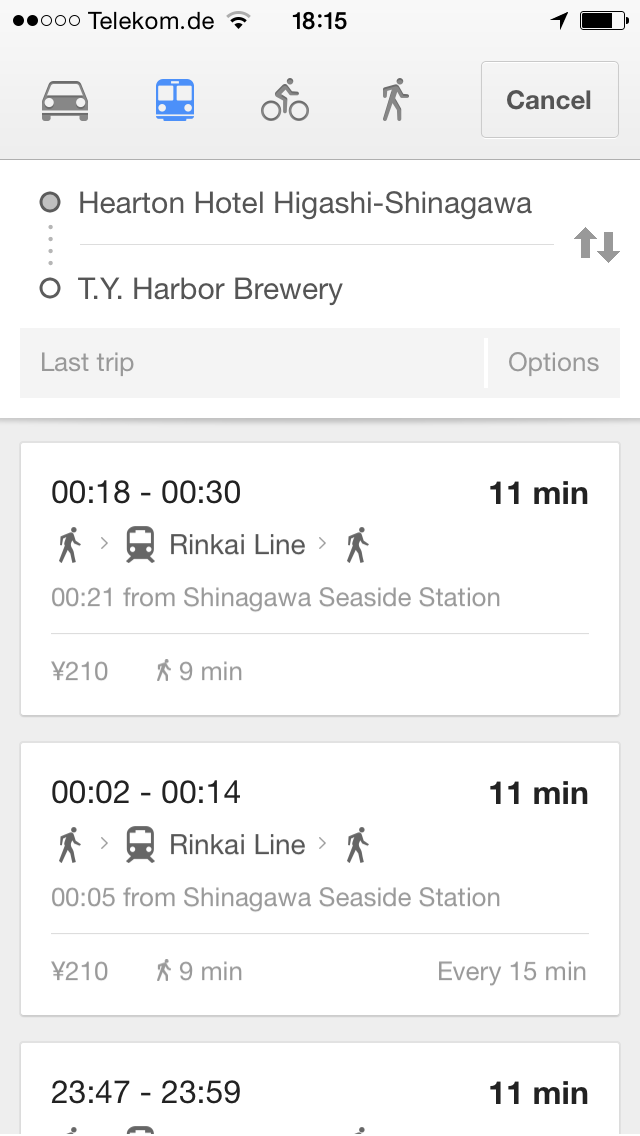
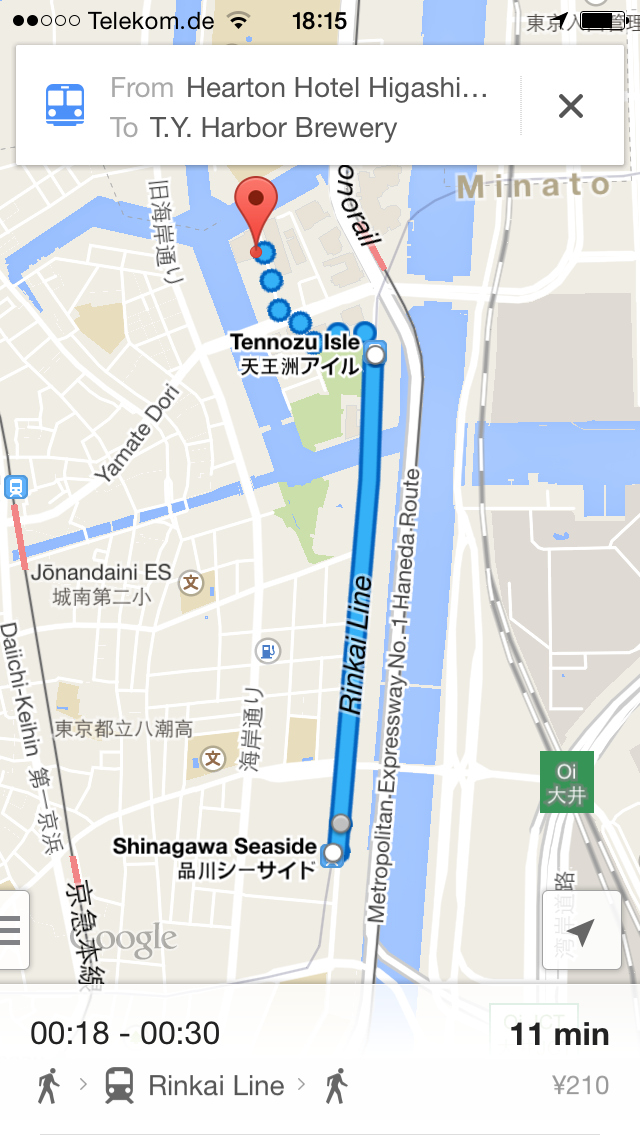
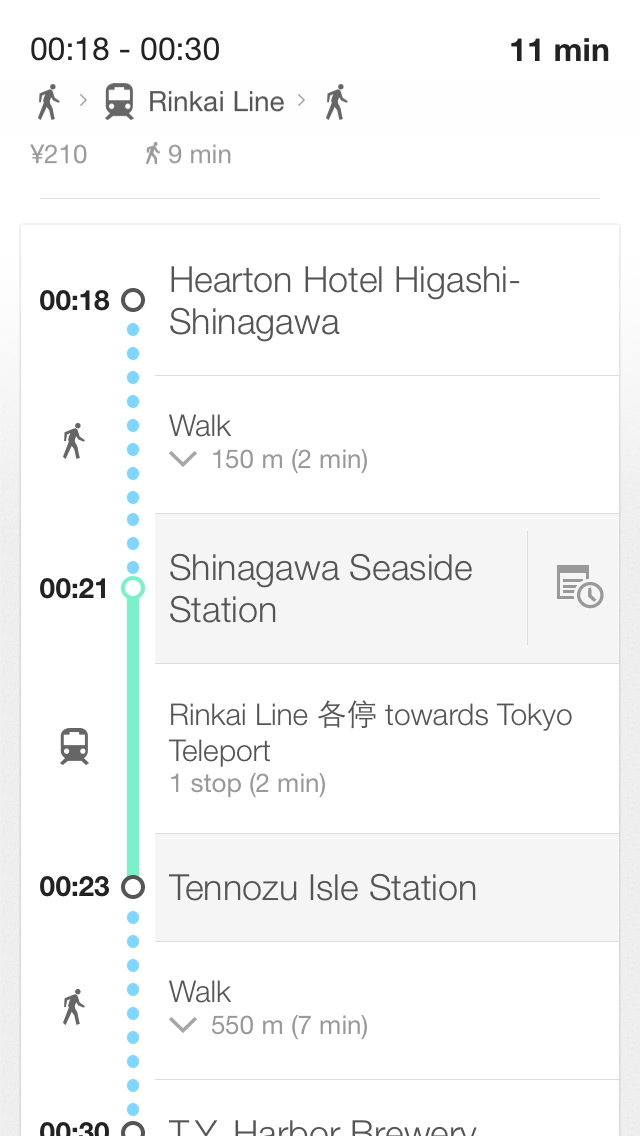
Notice the colored lines next to the different stations. That’s the color you’re looking for on the train. They are color coded! To find your right platform just take the information that Google gives you and look out for it. It will be written on signs “Rinkai towards Tokyo Teleport”.


Problem: Okay I know which train I have to use. But before I enter the platform I have to pass the ticket gate. How do I buy a ticket? How do I know which one?
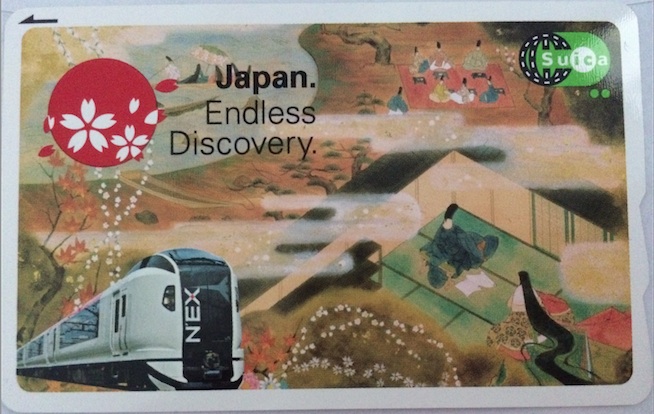
Solution: Get a Suica card and charge it! If you’re a group travelling: Look out for cheap group ticket offerings.
A Suica card (aka “Super Urban Intelligent Card”) can be used instead of buying a ticket. You can buy it where you can buy the tickets – most of the time it’s 500 Yen + charge. Charging it with some Yen is crucical since the gates will not let you in when your card is not at least charged with 210 Yen.
You may ask: If I buy a ticket from A to B I have to pay the price upfront. When I use the Suica how does it work then? Easy answer: When you enter the train station through the ticket gate you pass it with your Suica card. It will start a journey for you. When you exit it will end the journey. The card and system is intelligent enough to calculate all steps in between, add them up and substract the fare price from your Suica balance. It always takes the cheapest price for single travellers.
If you’re on your way as a group you might want to use the ticket machines before going through the ticket gates. The Suica is a personal card and only suited for one person to be used. So you cannot pass it through the ticket gate back and enter the ticket gate again without causing panic with the service personell.
To buy tickets for groups I suggest to switch the terminals to english – most of them will offer that option. You then have to specifically know where you want to go. Sometimes it’s the easiest way to just go to the counter and buy them there.
Sometimes when you bought tickets you find out that you made a mistake. Fear not! You can give them back and by doing so get your money back. Service personell is awesome and will help you at any time! DO NOT PANIC!
Another awesome feature you get ‘for free’ by having a Suica card is that you can use it with all the vending machines available everywhere in the train stations. Just pick the beverage you want and swipe the card. Done!
Beware: fill the card up before going out of the ticket gate when you used it all up!
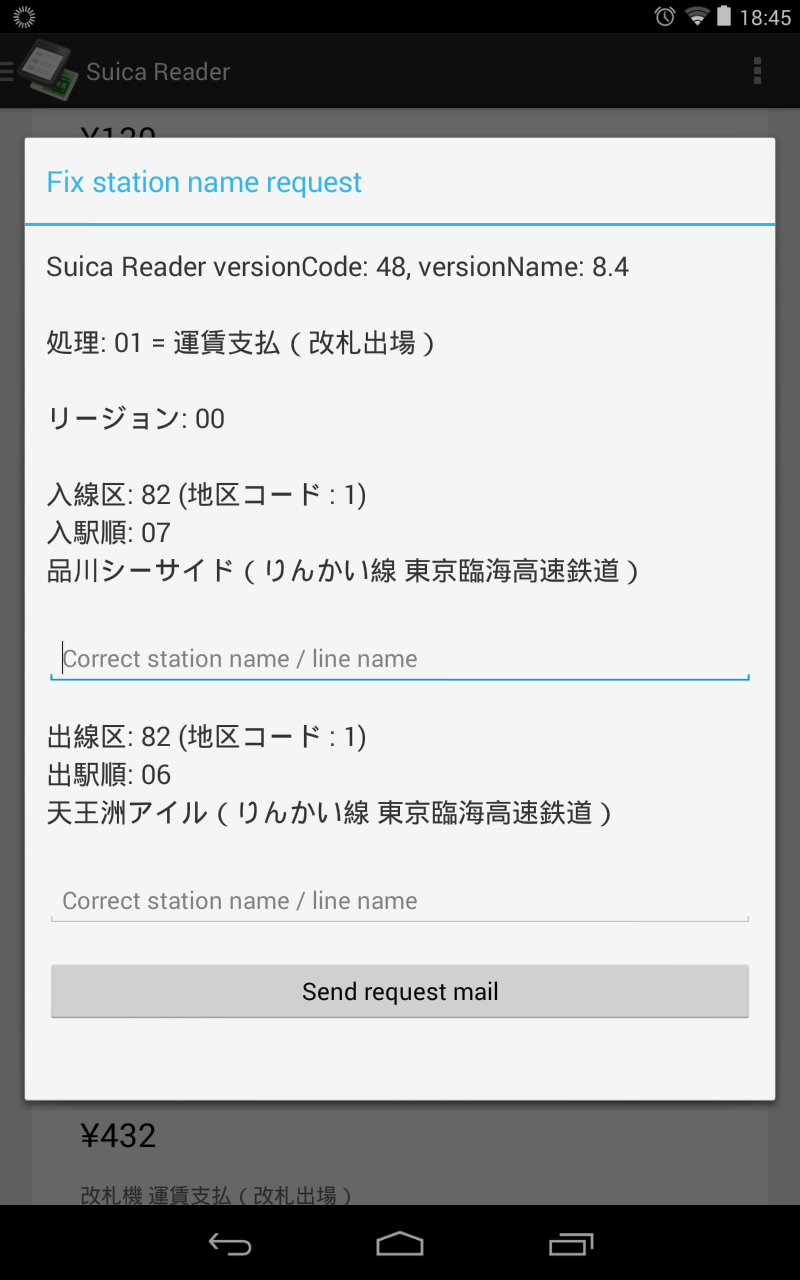
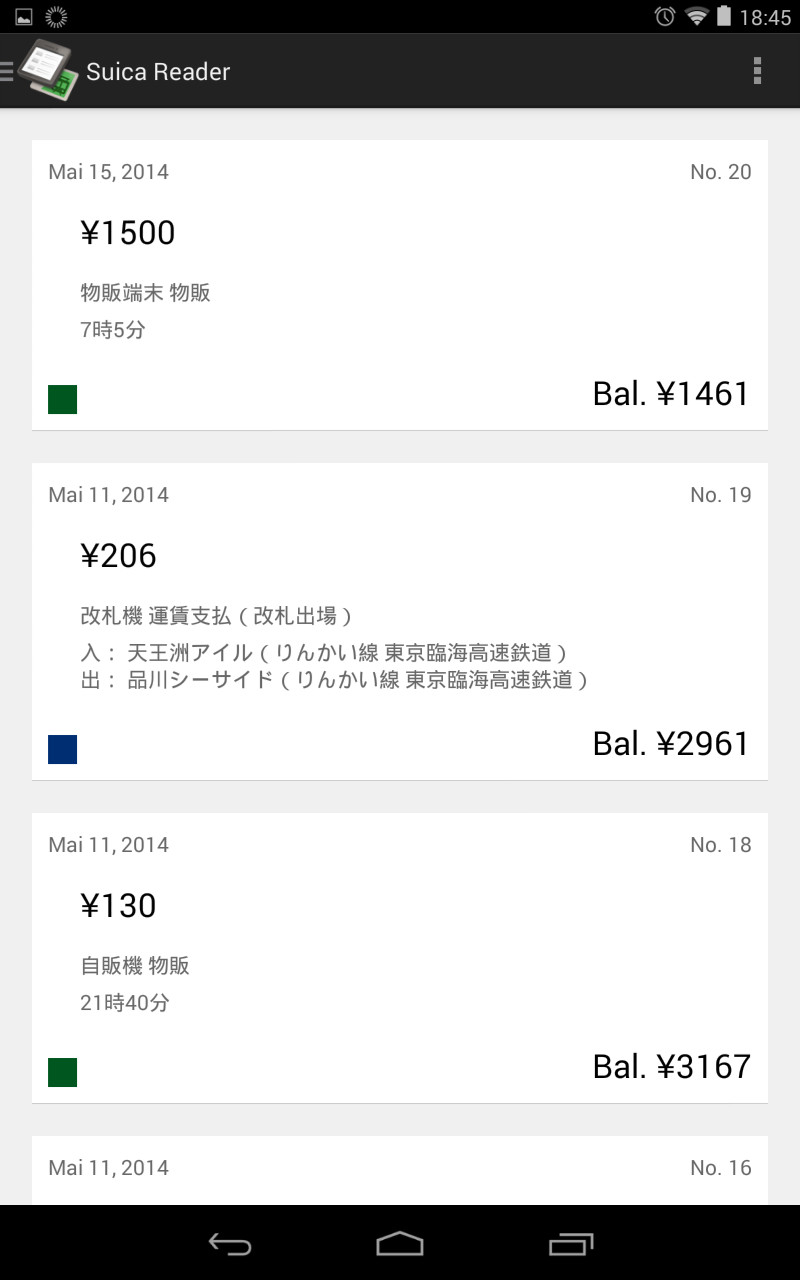
If you happen to have a NFC enabled device (like most Android phones) you can install the Suica Reader app from the Google Store and get information about what happened to your card so far.
If you visit Japan the next time and you want to get perfectly good Internet access while there on your mobile phone I can recommend the b-mobile offer. On my last stay in Japan (May 2014) I tried their service for the first time and I was not let down.
They give you two options: The 1 GB prepaid option gives you 1 GB as fast as possible. The 14days prepaid gives you 14 days of limited speed coverage (300kbps).
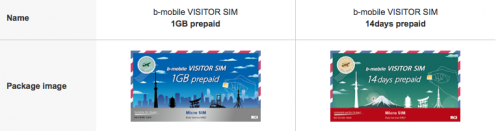
I went for the 14 days prepaid option knowing that I might get some usage depending on where I go. The 300kbps where faster than I thought – at no given time I experienced any speed problems. The coverage was awesome since it just dialed into NTT Docoms 3G/LTE network.
For just under € 30 this is an awesome option for any traveller. Even better: You can pick it up at the Airport or you can have it delivered to your hotel! We tried both and it worked both as expected. Fast delivery, perfect service!
Tsung is an open-source multi-protocol distributed load testing tool
It can be used to stress HTTP, WebDAV, SOAP, PostgreSQL, MySQL, LDAP and Jabber/XMPP servers. Tsung is a free software released under the GPLv2 license.
The purpose of Tsung is to simulate users in order to test the scalability and performance of IP based client/server applications. You can use it to do load and stress testing of your servers. Many protocols have been implemented and tested, and it can be easily extended.
It can be distributed on several client machines and is able to simulate hundreds of thousands of virtual users concurrently (or even millions if you have enough hardware …).
Source 1: http://tsung.erlang-projects.org/
I took notice of a website called “Spurious Correlations“. It seems that it collects all sorts of correlating statistics to proof the point of how important context is to statistics. Enjoy!

Source 1: http://www.tylervigen.com/
We’re living near a very nice city called Bamberg. And after a long time there are new Webcams availabel for anyone to look at. Even a 360 degree panoramic view!


Source 1: https://www.stadt.bamberg.de/
Source 2: http://www.bnv-bamberg.de/index.php/hotline/71-die-neuen-webcams

Stay tuned here for at least some coverage of this years Japan trip.
How many times did you experience a connection loss on your terminal window in the last week? Yeah I know – like everytime you close the lid of your notebook and move to a different place. So like a dozen times every day.
And everytime you reconnect to your servers and you use things like screen to keep your terminals open and your programs running while you’re disconnected.
On the other hand – did you ever curse the internet gods while you tried to do a very important check or bugfix to a machine whilst on a train or mobile roaming network? It’s not what I would call fun-times. When there are no constant disconnects the lag is just infuriating. MOSH also solves this since it’s predicting and responding way faster then vanilla SSH. Your terminal becomes useable again!
So there’s now MOSH to the rescue:
Remote terminal application that allows roaming, supports intermittent connectivity, and provides intelligent local echo and line editing of user keystrokes.
Mosh is a replacement for SSH. It’s more robust and responsive, especially over Wi-Fi, cellular, and long-distance links.
Mosh is free software, available for GNU/Linux, FreeBSD, Solaris, Mac OS X, and Android.
[youtube]http://www.youtube.com/watch?v=XsIxNYl0oyU[/youtube]
Install it on your servers and your clients and never lose a connection again.
Source 1: http://www.gnu.org/software/screen/
Source 2: http://mosh.mit.edu
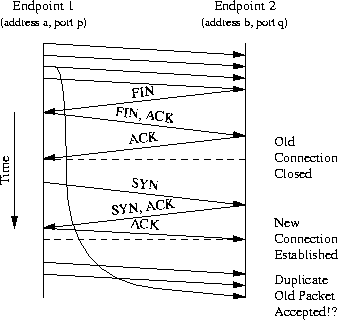
The purpose of TIME-WAIT is to prevent delayed packets from one connection being accepted by a later connection. Concurrent connections are isolated by other mechanisms, primarily by addresses, ports, and sequence numbers
Source: http://www.isi.edu/touch/pubs/infocomm99/infocomm99-web/
