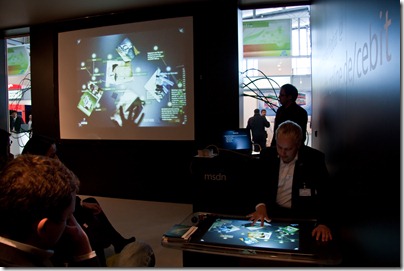
das außer-Haus Backup

Irgendwie werden es auch privat immer immer mehr Daten – mit immer zunehmender Geschwindigkeit… Alle paar Jahre tausche ich bei uns im Haushalt die Festplatten/Speicherlösung komplett aus – was zwar immer wieder mal eine Investitions bedeutet, gleichzeitig aber auch dafür sorgt dass Daten nicht irgendwelchen ungünstigen mechanischen, chemischen oder magnetischen Effekten zum Opfer fallen… Ja so etwa alle zwei Jahre wird alles einmal umkopiert… Das dauerte beim letzten Mal zwar gut eine Woche, aber naja so ist das eben…

Aus vielerlei Grund haben wir auch für einen Haushalt recht viel Bedarf an Speicherplatz – teilweise wohl auch weil meine Frau Photographin ist – aber ich als “werf-nix-weg”-Typ werd da auch einen guten Anteil dran haben…

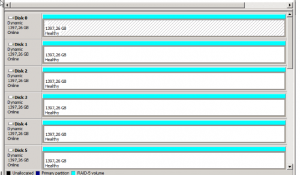
Herr über alle unsere Festplatten (kein Witz, die Rechner bei uns haben ihre Festplatten eigentlich nur um booten zu können) ist seit jeher ein einzelner Rechner welcher ebenso alle paar Jahre komplett ausgetauscht wird. Dieser Rechner verwaltet im Moment zwischen 12-15 Festplatten verschiedener Größe – Hauptarbeit wird zur Zeit durch drei separate (gewachsene) RAID-5 Volumes erledigt…

Nebenbei: Nein ich kann/will da kein RAID-6 fahren ohne entweder Linux zu verwenden (was aus verschiedenen Gründen nicht geht) oder einen Hardware-Controller zu verwenden, was nach einschlägigen Erfahrungen querbeet durch alle möglichen Hardware RAID Controller ausfällt.

Dem ganzen Festplattenstapel liegt dann ein Standard-PC mit Windows Server 2008 zugrunde – zum einen weil ich so eine Lizenz noch herumliegen hatte und zum anderen weil ich in über 10 Jahren File-Server Erfahrungen sammeln noch nie auch nur ein Byte unter Windows verloren habe. Zusätzlich habe ich einen riesigen Haufen Software welche Windows-only ist ud sozusagen ständig laufen muss um Sinn zu machen (Mail-Server Puffer, Newsserver Mirror, Musik und Video Streaming Server, Medienbibliothek, Videorekorder,…

Diese drei großen RAID Volumes schnappt sich dann Truecrypt und ver- und entschlüsselt zuverlässig vor sich hin – im Endeffekt gibt es kein Byte Daten im Haushalt welches nicht verschlüsselt wäre. Gut für uns.

So ein RAID verhindert nun ja aber nicht dass dennoch oben genannte ungünstige Effekte eintreten und man mal eine oder mehrere Defekte zu beklagen hat. Im Normalfall tauscht man die defekte Festplatte, resynct das RAID und alles funktioniert weiter ohne dass man Daten verloren hätte. Allerdings ist das ja kein Backup. Das ist nur eine erste Absicherung gegen mögliche Defekte.

Getreu folgendem kurzen Musikstück:

RAID ist kein Backup

… ist ein RAID eben kein Backup. Backups erledigt bei mir eine Sammlung von Scripten welche jeweils in festen Abständen Vollbackups und Differenz-Backups erstellt. Da kommt dann ein Haufen 1 Gbyte großer Dateien raus welche dann anschliessend per RSync in mühevoller (und dank funktionierendem QoS unbemerkt) Arbeit außer Haus geschafft werden. Die Komplett-Backups dauern aufgrund der großen Menge einfach ewig lang und lassen sich recht einfach dadurch beschleunigen dass man sozusagen das Backup physisch auf einer externen Festplatte zum Server trägt…die Differenz-Backups sind dann meist immer recht flott durchgelaufen. Speicherplatz im Internet wird ja auch immer billiger und so haben wir auch immer ein gutes Off-Site Backup unserer Daten…

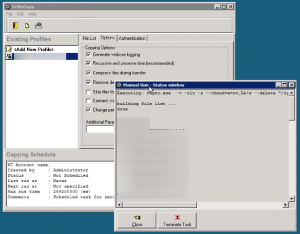
Für Windows gibt es neben den üblichen Cygwin Ports von rsync auch eine gute GUI Version namens DeltaCopy. Das Ding kopiert zuverlässig und auch wenn mal der DSL Router rebootet oder hängt nimmt er selbständig die Kopierarbeit wieder auf sobald Netz wieder verfügbar ist.

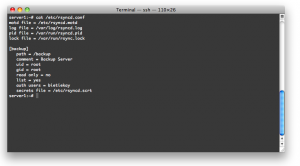
Damit DeltaCopy seine Daten irgendwo abladen kann wird auf der Gegenstelle natürlich ein rsync Server vorrausgesetzt. Die Konfiguration eines solchen ist nicht sonderlich kompliziert – im Grunde muss man nur rsync installieren und die rsyncd.conf Datei anpassen. Zusätzlich dazu muss man eine Konfigurationsdatei anlegen in welchem nach dem Schema “Benutzername:Passwort” entsprechend die Nutzeraccounts angegeben werden – das wars eigentlich schon. Rsync ist sehr robust und vor allem auch gut für geringere Bandbreiten geeignet. Wenn sich an einer Datei nur wenige Bytes geändert haben müssen auch nur die geänderten Bytes übertragen werden.

Source 1: http://www.speichergurke.de
Source 2: http://www.aboutmyip.com/AboutMyXApp/DeltaCopy.jsp
Source 3: http://de.wikipedia.org/wiki/Rsync

Shairport – someone reversed an AirPort Express

Low Latency Network Audio was a dream for the past years (see an article of 2005 and 2008) and with AirPlay it’s finally there.

I am using the Apple AirPlay technology for several years now… after it got implemented into iOS it’s just fantastic to have the option to have whatever sound source I want to playing loud and clear in any room I want to…

Okay it’s not quite as sophisticated as the sonos solution regarding the control of multiple music sources in multiple rooms but it get’s the job done in an apartment.

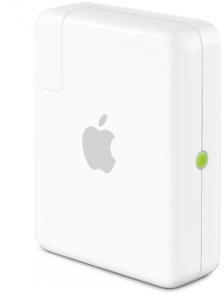
So back to the topic: Apple integrated the AirPlay technology into their wireless base station “AirPort Express”. Basically AirPlay is a piece of software which receives an encrypted audio stream over the network and outputs the stream to the SPDIF or audio jack.

Back in 2005 there already was an emulator of this protocol called “Fairport” but Apple decided to encrypt the AirPlay traffic. This led to the problem that the encryption key was unkown because it’s baked into the AirPort Express firmware. And this is where the good news start:

“My girlfriend moved house, and her Airport Express no longer made it with her wireless access point. I figured it’d be easy to find an ApEx emulator – there are several open source apps out there to play to them. However, I was disappointed to find that Apple used a public-key crypto scheme, and there’s a private key hiding inside the ApEx. So I took it apart (I still have scars from opening the glued case!), dumped the ROM, and reverse engineered the keys out of it.”

So to keep things short: Someone got an AirPort Express, dumped the firmware, extracted the AirPlay encryption keys and wrote an emulator of the AirPlay protocol which uses the key. Voilá!

ShairPort is available in source code on the site of the guy and obviously it’s unsure if Apple will react by changing the encryption key in the future. But for the time being it works as advertised:

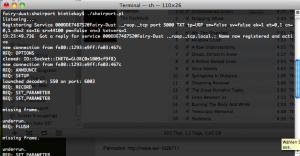
I took one of my computers and followed the instructions to update perl, install Macports and then run ShairPort. So when ShairPort is run it looks not as appealing as expected:

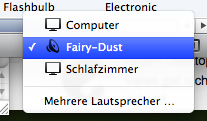
Notably  it uses IPv6 to communicate between iTunes and ShairPort… Oh I almost forgot to show how it looks in iTunes:

On another side note: It works on Linux, Windows and Mac OS X :-)

Source 1: Apple AirPlay
Source 2: Sonos
Source 3: Apple AirPort Express
Source 4: ShairPort

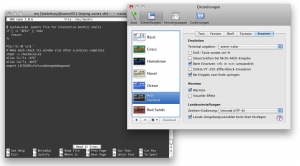
modifying OS X terminal to make it more useable…

Using OS X for the daily work is getting easier every day. And most of the time I am doing work using the Terminal.app.

So there are some configuration changes necessary to make it even more useable…

  1. Edit /etc/bashrc and add some alias and color definitions
    1. alias ll=”ls -hfG”
    2. alias la=”ls -ahfG”
    3. export LSCOLORS=fxfxcxdxbxegedabagacad
  2. custom color schemes can be defined using the lscolors tool
  3. install screen (using MacPorts for example) and setup a ~/.screenrc
    1. Download a sample .screenrc

Source 1: http://geoff.greer.fm/lscolors/
Source 2: http://www.macports.org/
Source 3: ScreenRC.tar

hacs is getting the first UI elements

I’ve worked on my little holiday project for a while now and it’s making great progress. Since logging is working for almost two weeks now I got some data that should be visualized. One main goal of the project is to have  a great UI to browse the sensor data.

So almost two weeks into the project I’ve started to learn JavaScript Smiley 

The logging server now included an internal http server which serves some pages and RESTful services already. One of those services is the sensor data service which can be asked to output JSON formatted sensor data. If you take that data using jQuery and the flot jQuery plugin you’ll get something like that:

jQuery and flot based hacs UI

Source: http://github.com/bietiekay/hacs

h.a.c.s. milestone 0–in need of a backup tool

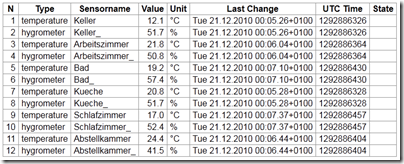
This EzControl XS1 device is a complex thing. And currently I am playing with more than 10 sensors and more than 10 actuators. Since poking around with such a device will most certainly lead to a condition where that configuration might get lost (like a power down for more than 30 minutes).

sensors

Therefore I was in need of a backup and restore tool. Because there isn’t one I had to write one myself. Here it is:

xs1-backup
I can haz backup tool

My tool is available as opensource as part of the h.a.c.s. toolkit here. Enjoy!

Source 1: https://github.com/bietiekay/hacs/wiki/H.a.c.s.-toolkit
Source 2: http://github.com/bietiekay/hacs/

hacs hardware arrived

My holiday project is progressing: Today it was hardware delivery day!

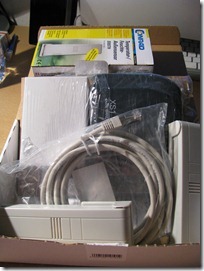
So this is the hardware which is ready to be used:

  • 1x EzControl XS1 controller
  • 2x Temperature and Humidity sensor
  • 8x Remote Power Switch

IMG_5408_thumb4

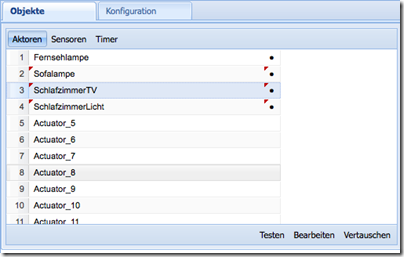
The EzControl XS1 is easy to use as far as I had the time to give it a try. After the network setup the XS1 offers a simple web interface and REST service. Built upon that REST service there is also a configuration application and a visualization application available. Those two applications are apparently built using the GWT framework.

Bildschirmfoto-2010-12-13-um-21.24.0[2]

Bildschirmfoto-2010-12-13-um-21.44.1

I poked around a bit with the sensor and actor configuration screens and everything just worked. Those applications are great for the easy tasks. And for everything else hacs is what is going to be the tool of choice (to be written).

Source 1: http://www.ezcontrol.de
Source 2: http://github.com/bietiekay/hacs
Source 3: http://code.google.com/intl/de-DE/webtoolkit/overview.html

my little home automation project has a home

Hurray! One of those EzControl XS1 plus some sensors and actors is on the way to me. So I can finally start the little holiday project which will be called “HACS” (Home Automation Control Server).

The source code and documentation repository is up on GitHub as of now – you can access it here: https://github.com/bietiekay/hacs

If you are interested in working on that project – drop a comment.

great SIP Softphone for Linux and Windows

Thank goodness I can uninstall X-Lite! At sones we are using a SIP based telephony solution. And therefore some times a SIP softphone application is needed along with the obligatory hardware SIP telephones. Till today the only half-working software I knew for that task was X-Lite. But a colleague told me today that there is a better software which not even looks better but also works better than X-Lite.

It’s called “Ekiga” and it’s a GTK based open source application which can run on Windows and Linux. It looks clean and therefore nice and works great.

A special tip from me: Abort the Welcome Wizard because the only thing it does is registering you with ekigas’ own services.

Capture

Source: http://ekiga.org/

FFN-Switcher auf GitHub umgezogen

Es ist ja nun schonwieder einige Zeit her dass ich etwas über meine CB-Funk Software namens “FFN-Switcher” geschrieben habe. Nun ist es immerhin mal wieder soweit dass ich zeit gefunden habe mich mit einigen Bugfixes zu beschäftigen.

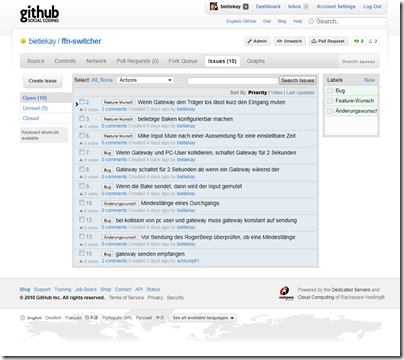
Gleichzeitig habe ich den Sourcecode von meinem privaten Subversion Repository auf den öffentlich zugänglichen GitHub Dienst hochgeladen. Dort kann der Sourcecode und was noch viel wichtiger ist: die Bug- und Wunschliste abgerufen und editiert werden.


github-ffnswitcher

http://github.com/bietiekay/ffn-switcher/ 

Natürlich gab es in der Zwischenzeit auch einige Bugfixes. Sodass mittlerweile Version 111 online steht und über die automatische Updatefunktion abgerufen werden kann.

Source: http://github.com/bietiekay/ffn-switcher/

TechEd Europe 2010–if you’re there we could meet!

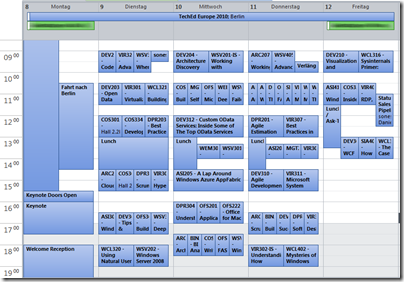
After 5 years of TechEd abstinence it’s time to visit the conference again. This years TechEd will be held in Berlin which is quite nice since traveling will be reduced to a minimum. Since the session schedule is already available I’ve already filled my calendar for TechEd week.

techedcalendar

Okay it’s impressive to see that so many interesting sessions can be held in one week’ – the bad thing is that I need do decide which to go and which to watch on video later.

On later notice: Since I will be there it would be a great opportunity to meet. Let me know if you are there and want to meet.

Mono 2.8 released!

Hurray! Finally the 2.8 version of Mono – the platform independent open source .NET framework is available as of today. I finally don’t have to recompile the trunk every now and then to get my bits running Smiley

The Major Highlights according to the release notes are:

  • C# 4.0
  • Defaults to the 4.0 profile.
  • New Garbage Collection engine
  • New Frameworks:
    • Parallel Framework
    • System.XAML
  • Threadpool exception behavior has changed to match .NET 2.0
    • potentially a breaking change for a lot of Mono-only software
    • See information below in the "Runtime" section.
  • New Microsoft open sourced frameworks bundled:
    • System.Dynamic
    • Managed Extensibility Framework
    • ASP.NET MVC 2
    • System.Data.Services.Client (OData client framework)
  • Performance
    • Large performance improvements
    • LLVM support has graduated to stable
      • Use mono-llvm command to run your server loads with the LLVM backend
  • Preview of the Generational Garbage Collector
  • Version 2.0 of the embedding API
  • WCF Routing
  • .NET 4.0’s CodeContracts
  • Removed the 1.1 profile and various deprecated libraries.
  • OpenBSD support integrated
  • ASP.NET 4.0
  • Mono no longer depends on GLIB

Oh – they even linked my benchmark article.

Source: http://www.mono-project.com/Release_Notes_Mono_2.8

winter 2011 hacking project: Home Automation

In the last 10+ years I was fiddling with different home automation concepts. Mostly without broad use cases because at that time no one seemed to be interested in having sensors and actors like crazy at home. In fact not that many people seem to care these days.

Having more and more hardware and software around us creates the use cases for a broader audience people like me have for 10+ years. Mainstream is a bitch for nerds Smiley

That said I found a nice plastic box I want to use in a winter project. This plastic box is called “EzControl XS1”. It comes with several visible and “invisible” interfaces.

The visible and obvious ones are: power, 100 mbit ethernet, sd card slot. So it takes some power and does something on the network. The not so obvious and therefore “invisible” interfaces are the most interesting ones: the EzControl XS1 comes with the ability to send and receive on 433 Mhz and 868 Mhz.

ezcontrol_xs1-200

Yes that are the ranges used by switchable and dimable power sockets, temperature sensor and AMR. The EzControl XS1 is not that cheap (coming at 189 Euros for the base version and additional 65 Euros per upgrade option). I do not own one yet so it’s the plan to acquire at least one and start of with dimable power sockets and add more sensors and actors on the way

One great feature of the EzControl XS1 is the embedded WebServer with which the users application (the one I want to write) can interact using a HTTP/JSON Protocol. Oh dear: Sensor data and Actor control using JSON. How great is that!

There is some example code available (even a proprietary iPad/iPhone client) but since I want to have some custom features I do not currently see to be available in software I am going to write a set of tools which will get and protocol sensor data and run scripts to controls actors. Oh it’ll be all available as open source (license not yet chosen).

P.S.: If some one from Rose+Herleth is reading this and wants to help – send me a test unit Smiley

Source 1: http://www.ezcontrol.de (in german though)
Source 2: http://en.wikipedia.org/wiki/Automatic_meter_reading
Source 3: http://www.ezcontrol.de/content/view/12/31/

Sintel:

After the last Open Movie Project “Bug Buck Bunny” – Sintel is the next short movie available for free download. Get it here.

“Sintel” is an independently produced short film, initiated by the Blender Foundation as a means to further improve and validate the free/open source 3D creation suite Blender. With initial funding provided by 1000s of donations via the internet community, it has again proven to be a viable development model for both open 3D technology as for independent animation film.
This 15 minute film has been realized in the studio of the Amsterdam Blender Institute, by an international team of artists and developers. In addition to that, several crucial technical and creative targets have been realized online, by developers and artists and teams all over the world.

“Sintel” commenced in May 2009, with producer Ton Roosendaal establishing a core team consisting of Colin Levy (director), David Revoy (concept art), Martin Lodewijk (story) and Jan Morgenstern (composer). In August script writer Esther Wouda was approached as a consultant, which resulted in her taking the responsibility for the entire screenplay. Esther then worked in close cooperation with Colin, David and Ton to deliver the final script early November. Meanwhile, Colin and David realized the first storyboards.

Based on a public call for artists – with over 150 respondents – the Durian artist team got established in July 2009. They first met in a pre-production week in Amsterdam in August, and all decided to join the project per October 1st. With the final movie budget still unknown, the target then still was to finish the film within 7 months, with a team of 6 artists and 2 developers. At that time the team still had the hopes to be able to realize the script in a 6-8 minute film.

In november, the Netherlands Film Fund approved on a substantial subsidy for Sintel, enough to extend the project to 10 months, with possible 1 or 2 extra artist seats in the final months. It was also by this time that breakdowns and animatic edits showed that the script had to be revised to become more compact, with a story structure using a flashback.

In the months after, Colin’s work on the Director’s Layout – 3D animatic shots – and final designs on the grand finale gradually made the movie longer, from 9 minutes in november, to almost 12 in May. Proper story telling, to absorb an audience with convincing characters and action just takes time!

With the highly anticipated extra funding from the Amsterdam Cinegrid – also funding a 4k resolution version – Ton finally could extend the team with 5 artists and a developer in March 2010. With 14 people the film then was completed for a first screening on July 18th in cinema Studio K in Amsterdam.
Three artists then stayed in Amsterdam working on final shot edits, lighting design, compositing, and on the impressive 2 minute film credits. The movie ended up with a total duration of 14m:48s, 888 seconds!

Watch it now:

Sintel

Source 1: Elephants Dream
Source 2: Big Buck Bunny 
Source 3: Sintel
Source 3: Sintel Download

Windows Live Writer 2011 is available…

I am a huge fan of the Windows Live Writer. It’s been some years now since Microsoft made this free tool available to bloggers who want to blog on Windows. And in a bold move Microsoft announced the other week that they will be moving all Windows Live Spaces weblogs (a free weblog hosting service) to WordPress.

In an accompanying step they just released the 2011 version of the Windows Live Writer. Actually I think it’s a shame that there is no comparable tool on Mac OS X … which is quite unusual since those types of tools in that quality are more common on the apple platform.

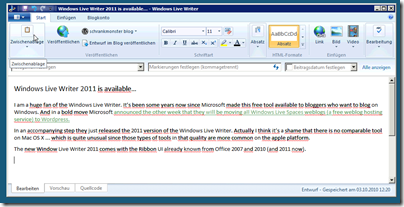
The new Window Live Writer 2011 comes with the Ribbon UI already known from Office 2007 and 2010 (and 2011 now).

wlw2011

Source 1: http://wordpress.visitmix.com/
Source 2: http://explore.live.com/windows-live-essentials

visualize your source control

There’s a great tool available to create impressive visualizations of source code repositories:

“Software projects are displayed by Gource as an animated tree with the root directory of the project at its centre. Directories appear as branches with files as leaves. Developers can be seen working on the tree at the times they contributed to the project.

Currently there is first party support for Git, Mercurial and Bazaar, and third party (using additional steps) for CVS and SVN. “


Source: http://code.google.com/p/gource/

draw concept maps the easy way

I often have to draw concept diagrams and until now I had to use MindMap tools and tools like Visio. And up until now it wasn’t that much fun… but first things first, what’s a Concept Map?

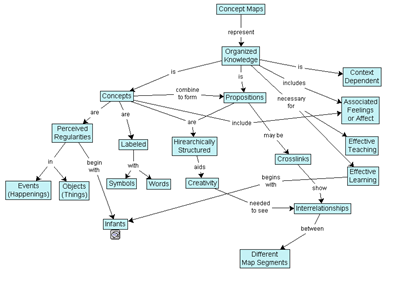
“A concept map is a diagram showing the relationships among concepts. They are graphical tools for organizing and representing knowledge.

Concepts, usually represented as boxes or circles, are connected with labeled arrows in a downward-branching hierarchical structure. The relationship between concepts can be articulated in linking phrases such as "gives rise to", "results in", "is required by," or "contributes to".

For example a concept map might looks like this:

conceptmapsample

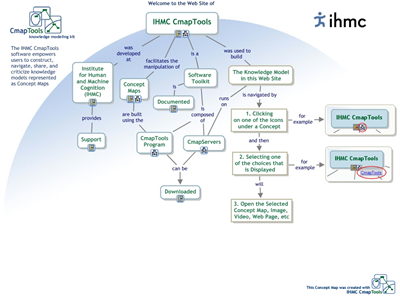
So I found a tool called “IHMC CmapTools” – a great package of software available for Windows, Mac OS X and Linux. And this tool makes it so much easier to create impressive and expressive concept maps. It’s freeware and can be used even for commercial purposes.

cmaptools

Source: http://cmap.ihmc.us/

style your Visual Studio

It’s been some time since I’ve written about a Visual Studio Color Theme Generator. And obviously since then a lot happened in the world of customization tools.

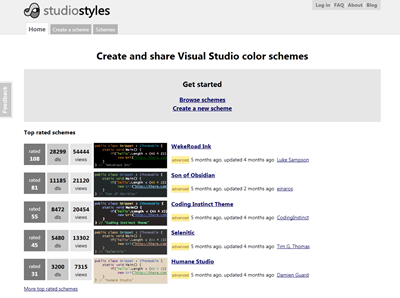
The website studiostyles.info is there to help the day with a lot of previewable Visual Studio styles. Even better: all styles can be exported for Visual Studio 2005, 2008 and 2010.

studiostyles

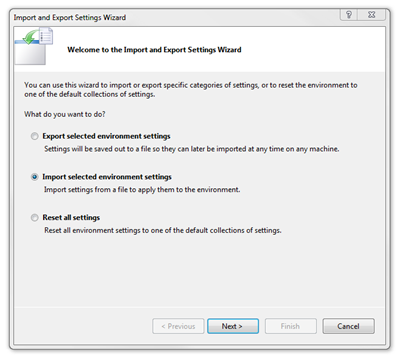
For Visual Studio 2010 you get a .vssettings file which can be imported into Visual Studio using the Tools->Import  and Export Settings… menu item.

importstyle

codeeditorstyle

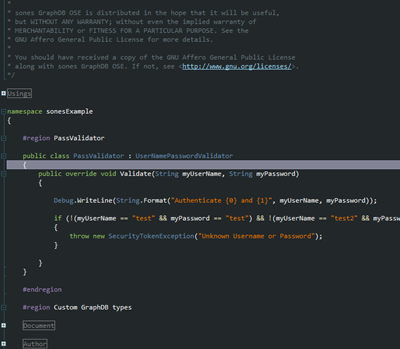
For Visual Studio 2010 there are additional color styling options available. Microsoft offers a plugin for Visual Studio 2010 called Visual Studio Color Theme Editor. Using this tool everything else can be color customized. So you can have something like that:

vs2010colortheme

Source 1: http://www.schrankmonster.de/2008/08/10/visual-studio-color-theme-generator/
Source 2: http://studiostyles.info/
Source 3: Visual Studio Color Theme Editor

benchmarking the sones GraphDB (on Mono (sgen) and .NET)

Since we’re at it – we not only took the new Mono garbage collector through it’s paces regarding linear scaling but we also made some interesting measurements when it comes to query performance on the two .NET platform alternatives.

The same data was used as in the last article about the Mono GC. It’s basically a set of 200.000 nodes which hold between 15 to 25 edges to instances of another type of nodes. One INSERT operation means that the starting node and all edges + connected nodes are inserted at once.

We did not use any bulk loading optimizations – we just fed the sones GraphDB with the INSERT queries. We tested on two platforms – on Windows x64 we used the Microsoft .NET Framework and on Linux x64 we used a current Mono 2.7 build which soon will be replaced by the 2.8 release.

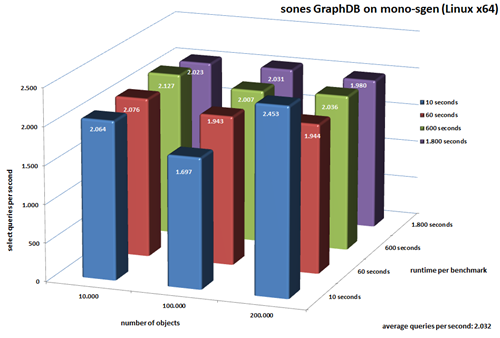
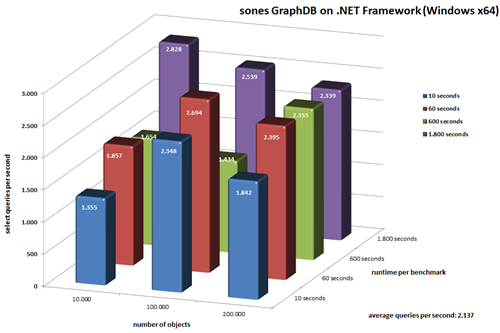
After the import was done we started the benchmarking runs. Every run was given a specified time to complete it’s job. The number of queries that were executed within this time window was logged. Each run utilized 10 simultaneously querying clients. Each client executed randomly generated queries with pre-specified complexity.

The Import

Not surprisingly both platforms are almost head-to-head in average import times. While Mono starts way faster than .NET the .NET platform is faster at the end with a larger dataset. We also measured the ram consumption on each platform and it turns out that while Mono takes 17 kbyte per complex insert operation on average the Microsoft .NET Framework only seems to take 11 kbyte per complex insert operation.

The Benchmark

Let the charts speak for themselves first:

mononet

click to enlarge

benchmark-mono-sgen
click on the picture to enlarge

benchmark-dotnet
click on the picture to enlarge

As you can see on both platforms the sones GraphDB is able to work through more than 2.000 queries per second on average. For the longest running benchmark (1800 seconds) with all the data imported .NET allows us to answer 2.339 queries per second while Mono allows us to answer 1.980 queries per second.

The Conclusion

With the new generational garbage collector Mono surely made a great leap forward. It’s impressive to see the progress the Mono team was able to make in the last months regarding performance and memory consumption. We’re already considering Mono an important part of our platform strategy – this new garbage collector and benchmark results are showing us that it’s the right thing to do!

UPDATE: There was a mishap in the “import objects per second” row of the above table.

taking the new and shiny Mono Simple Generational Garbage Collector ( mono-sgen ) for a walk…

“Mono is a software platform designed to allow developers to easily create cross platform applications. It is an open source implementation of Microsoft’s .Net Framework based on the ECMA standards for C# and the Common Language Runtime. We feel that by embracing a successful, standardized software platform, we can lower the barriers to producing great applications for Linux.” (Source)

In other words: Mono is the platform which is needed to run the sones GraphDB on any operating system different from Windows. It included the so called “Mono Runtime” which basically is the place where the sones GraphDB “lives” to do it’s work.

Being a runtime is not an easy task. In fact it’s abilities and algorithms take a deep impact on the performance of the application that runs on top of it. When it comes to all things related to memory management the garbage collector is one of the most important parts of the runtime:

“In computer science, garbage collection (GC) is a form of automatic memory management. It is a special case of resource management, in which the limited resource being managed is memory. The garbage collector, or just collector, attempts to reclaim garbage, or memory occupied by objects that are no longer in use by the program. Garbage collection was invented by John McCarthy around 1959 to solve problems in Lisp.” (Source)

The Mono runtime has always used a simple garbage collector implementation called “Boehm-Demers-Weiser conservative garbage collector”. This implementation is mainly known for its simplicity. But as more and more data intensive applications, like the sones GraphDB, started to appear this type of garbage collector wasn’t quite up to the job.

So the Mono team started the development on a Simple Generational Garbage collector whose properties are:

  • Two generations.
  • Mostly precise scanning (stacks and registers are scanned conservatively).
  • Copying minor collector.
  • Two major collectors: Copying and Mark&Sweep.
  • Per-thread fragments for fast per-thread allocation.
  • Uses write barriers to minimize the work done on minor collections.

To fully understand what this new garbage collector does you most probably need to read this and take a look inside the mono s-gen garbage collector code.

So what we did was taking the old and the new garbage collector and our GraphDB and let them iterate through an automated test which basically runs 200.000 insert queries which result in more than 3.4 million edges between more than 120.000 objects. The results were impressive when we compared the old mono garbage collector to the new mono-sgen garbage collector.

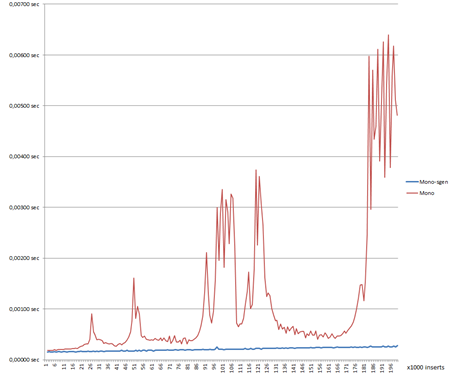
When we plotted a basic graph of the measurements we got that:


monovsmono-sgen

On the x-axis it’s the number of inserts and on the y-axis it’s the time it takes to answer one query. So it’s a great measurement to see how big actually the impact of the garbage collector is on a complex application like the sones GraphDB.

The red curve is the old Boehm-Demers-Weiser conservative garbage collector built into current stable versions of mono. The blue curve is the new SGEN garbage collector which can be used by invoking Mono using the “mono-sgen” command instead of the “mono” command. Since mono-sgen is not included in any stable build yet it’s necessary to build mono from source. We documented how to do that here.

So what are we actually seeing in the chart? We can see that mono-sgen draws a fairly linear line in comparison to the old mono garbage collector. It’s easy to tell why the blue curve is rising – it’s because the number of objects is growing with each millisecond. The blue line is just what we are expecting from a hard working garbage collector. To our surprise the old garbage collector seems to have problems to cope with the number of objects over time. It spikes several times and in the end it even gets worse by spiking all over the place. That’s what we don’t want to see happening anywhere.

The conclusion is that if you are running something that does more than printing out “Hello World” on Mono you surely want to take a look at the new mono-sgen garbage collector. If you’re planning to run the sones GraphDB on Mono we highly recommend to use mono-sgen.

the “Crunchbase use-case” part 4 – the initial data import

It’s about time to import some data into our previously established object scheme. If you want to do this yourself you want to first run the Crunchbase mirroring tool and create your own mirror on your hard disk.

In the next step another small tool needs to be written. A tool that creates nice clean GQL import scripts for our data. Since every data source is different there’s not really a way around this step – in the end you’ll need to extract data here and import data here. One possible different solution could be to implement a dedicated importer for the GraphDB – but I’ll leave that for another article series. Back to our tool: It’s called “First-Import” and it’s only purpose is to create a first small graph out of the mirrored Crunchbase data and fill the mainly primitive data attributes. Download this tool here.

This is why in this first step we mainly focus on the following object types:

  • Company
  • FinancialOrganization
  • Person
  • Product
  • ServiceProvider

Additionally all edges to a company object and the competition will be imported in this part of the article series.

So what does the first-import tool do? Simple:

  1. it deserializes the JSON data into a useable object – in this case it’s written in C# and uses .NETs own JavaScript deserializer
  2. it then maps all attributes of that deserialized JSON object to attribute names in our graph data object scheme and it does so by outputting a simple query
    1. Simple Attribute Types like String and Integer are just simply assigned using the “=” operator in the Graph Query Language
    2. 1:1 References are assigned by assigning a REF(…) to the attribute – for example: INSERT INTO Product VALUES (Company = REF(Permalink=’companyname’))
    3. 1:n References are assigned by assigning a SETOF(…) to the attribute – because we are not using a bulk import interface but the standard GQL REST Interface it’s necessary that the object(s) we’re going to reference are already in existence – therefore we chose to do this 1:n linking step after creating the objects itself in a separate UPDATE step. Knowing this the UPDATE looks like this: UPDATE Company SET (ADD TO Competitions SETOF(permalink=’…’,permalink=’…’)) WHERE Permalink = ’companyname’

For the most part of the work it’s copy-n-paste to get the first-import tool together – it could have been done in a more sophisticated way (like using reflection on the deserialized JSON objects) but that’s most probably part of another article.

When run in the “crunchbase” directory created by the Crunchbase Mirroring tool the first-import tool generates GQL scripts – 6 of them to be precise:
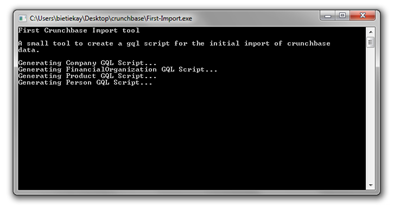
crunchbase-first-import

gql-scripts-part-4

The last script is named “Step_3” because it’s supposed to come after all the others.

These scripts can be easily imported after establishing the object scheme. The thing is though – it won’t be that fast. Why is that? We’re creating several thousand nodes and the edges between them. To create such an edge the Query Language needs to identify the node the edge originates and the node the edge should point to. To find these nodes the user is free to specify matching criteria just like in a WHERE clause.

So if you do a UPDATE Company SET (ADD TO Competitions SETOF(Permalink=’company1’,Permalink=’company2’)) WHERE Permalink = ’companyname’ the GraphDB needs to access the node identified by the Permalink Attribute with the value “companyname” and the two nodes with the values “company1” and “company2” to create the two edges. It will work just like all the scripts are but it won’t be as fast as it could be. What can help to speed up things are indices. Indices are used by the GraphDB to identify and find specific objects. These indices are used mainly in the evaluation of a WHERE clause.

The sones GraphDB offers a number of integrated indices, one of which is HASHTABLE which we are going to use in this example. Furthermore everyone interested can implement it’s own index plugin – we will have a tutorial how to do that online in the future – if you’re interested now just ask how we can help you to make it happen!

Back to the indices in our example:

The syntax of creating an index is quite easy, the only thing you have to do is tell the CREATE INDEX query on which type and attribute the index should be created and of which indextype the index should be. Since we’re using the Permalink attribute of the Crunchbase objects as an identifier in the example (it could be any other attribute or group of attributes that identify one particular object) we want to create indices on the Permalink attribute for the full speed-up. This would look like this:

  • CREATE INDEX ON Company (Permalink) INDEXTYPE HashTable
  • CREATE INDEX ON FinancialOrganization (Permalink) INDEXTYPE HashTable
  • CREATE INDEX ON Person (Permalink) INDEXTYPE HashTable
  • CREATE INDEX ON ServiceProvider (Permalink) INDEXTYPE HashTable
  • CREATE INDEX ON Product (Permalink) INDEXTYPE HashTable

Looks easy, is easy! To take advantage of course this index creation should be done before creating the first nodes and edges.

After we got that sorted the only thing that’s left is to run the scripts. This will, depending on your machine, take a minute or two.

So after running those scripts what happened is: all Company, FinancialOrganization, Person, ServiceProvider and Product objects are created and filled with primitive data types

  1. all attributes which are essentially references (1:1 or 1:n) to a Company object are being set, these are
    1. Company.Competitions
    2. Product.Company

That’s it for this part – in the next part of the series we will dive deeper into connecting nodes with edges. There is a ton of things that can be done with the data – stay tuned for the next part.
The "Crunchbase use-case" part 3 – How does a graph data scheme start?

After the overview and the first use-case introduction it’s about time to play with some data objects.

So how can one actually access the data of crunchbase? Easy as pie: Crunchbase offers an easy to use interface to get all information out of their database in a fairly structured JSON format. So what we did is to write a tool that actually downloads all the available data to a local machine so we can play with it as we like in the following steps.

This small tool is called MirrorCrunchbase and can be downloaded in binary and sourcecode here. As for all sourcecode and tools in this series this runs on windows and linux (mono). You can use the sourcecode to get an impression what’s going on there or just the included binaries (in bin/Debug) to mirror the data of Crunchbase.

To say a few words about what the MirrorCrunchbase tool actually does first a small source code excerpt:

So first it gets the list of all objects like the company names and then it retrieves each company object according to it’s name and stores everything in .js files. Easy eh?

When it’s running you get an output similar to that:

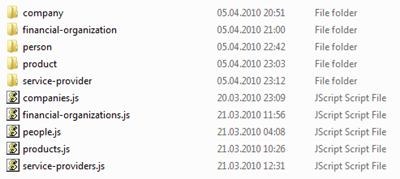
And after the successful completion you should end up with a directory structure

crunchbase_directory_structure

The .js files store basically every information according to the data scheme overview picture of part 2.  So what we want to do now is to transform this overview into a GQL data scheme we can start to work with. A main concept of sones GraphDB is to allow the user to evolve a data scheme over time. That way the user does not have to have the final data scheme before the first create statement. Instead the user can start with a basic data scheme representing only standard data types and add complex user defined types as migration goes along. That’s a fundamentally different approach from what database administrators and users are used to today.

Todays user generated data evolves and grows and it’s not possible to foresee in which way attributes need to be added, removed, renamed. Maybe the scheme changes completely. Everytime the necessity emerged to change anything on a established and populated data scheme it was about time to start a complex and costly migration process. To substantially reduce or even in some cases eliminate the need for such a complex process is a design goal of the sones GraphDB.

In the Crunchbase use-case this results in a fairly straight-forward process to establish and fill the data scheme. First we create all types with their correct name and add only those attributes which can be filled from the start – like primitives or direct references. All Lists and Sets of Edges can be added later on.

So these would be the Create-Type Statements to start with in this use-case:

  • CREATE TYPE Company ATTRIBUTES ( String Alias_List, String BlogFeedURL,    String BlogURL, String Category, DateTime Created_At, String CrunchbaseURL, DateTime Deadpooled_At, String Description, String EMailAdress, DateTime Founded_At, String HomepageURL, Integer NumberOfEmployees, String Overview, String Permalink, String PhoneNumber, String Tags, String TwitterUsername, DateTime Updated_At, Set<Company> Competitions )
  • CREATE TYPE FinancialOrganization ATTRIBUTES ( String Alias_List, String BlogFeedURL, String BlogURL, DateTime Created_At, String CrunchbaseURL, String Description, String EMailAdress, DateTime Founded_At, String HomepageURL, String Name, Integer NumberOfEmployees, String Overview, String Permalink, String PhoneNumber, String Tags, String TwitterUsername, DateTime Updated_At )
  • CREATE TYPE Product ATTRIBUTES ( String BlogFeedURL, String BlogURL, Company Company, DateTime Created_At, String CrunchbaseURL, DateTime Deadpooled_At, String HomepageURL, String InviteShareURL, DateTime Launched_At, String Name, String Overview, String Permalink, String StageCode, String Tags, String TwitterUsername, DateTime Updated_At)
  • CREATE TYPE ExternalLink ATTRIBUTES ( String ExternalURL, String Title )
  • CREATE TYPE EmbeddedVideo ATTRIBUTES ( String Description, String EmbedCode )
  • CREATE TYPE Image ATTRIBUTES ( String Attribution, Integer SizeX, Integer SizeY, String ImageURL )
  • CREATE TYPE IPO ATTRIBUTES ( DateTime Published_At, String StockSymbol, Double Valuation, String ValuationCurrency )
  • CREATE TYPE Acquisition ATTRIBUTES ( DateTime Acquired_At, Company Company, Double Price, String PriceCurrency, String SourceDestination, String SourceURL, String TermCode )
  • CREATE TYPE Office ATTRIBUTES ( String Address1, String Address2, String City, String CountryCode, String Description, Double Latitude, Double Longitude, String StateCode, String ZipCode )
  • CREATE TYPE Milestone ATTRIBUTES ( String Description, String SourceDescription, String SourceURL, DateTime Stoned_At )
  • CREATE TYPE Fund ATTRIBUTES ( DateTime Funded_At, String Name, Double RaisedAmount, String RaisedCurrencyCode, String SourceDescription, String SourceURL )
  • CREATE TYPE Person ATTRIBUTES ( String AffiliationName, String Alias_List, String Birthplace, String BlogFeedURL, String BlogURL, DateTime Birthday, DateTime Created_At, String CrunchbaseURL, String FirstName, String HomepageURL, Image Image, String LastName, String Overview, String Permalink, String Tags, String TwitterUsername, DateTime Updated_At )
  • CREATE TYPE Degree ATTRIBUTES ( String DegreeType, DateTime Graduated_At, String Institution, String Subject )
  • CREATE TYPE Relationship ATTRIBUTES ( Boolean Is_Past, Person Person, String Title )
  • CREATE TYPE ServiceProvider ATTRIBUTES ( String Alias_List, DateTime Created_At, String CrunchbaseURL, String EMailAdress, String HomepageURL, Image Image, String Name, String Overview, String Permalink, String PhoneNumber, String Tags, DateTime Updated_At )
  • CREATE TYPE Providership ATTRIBUTES ( Boolean Is_Past, ServiceProvider Provider, String Title )
  • CREATE TYPE Investment ATTRIBUTES ( Company Company, FinancialOrganization FinancialOrganization, Person Person )
  • CREATE TYPE FundingRound ATTRIBUTES ( Company Company, DateTime Funded_At, Double RaisedAmount, String RaisedCurrencyCode, String RoundCode, String SourceDescription, String SourceURL )

You can directly download the according GQL script here. If you use the sonesExample application from our open source distribution you can create a subfolder “scripts” in the binary directory and put the downloaded script file there. When you’re using the integrated WebShell, which is by default launched on port 9975 an can be accessed by browsing to http://localhost:9975/WebShell you can execute the script using the command “execdbscript” followed by the filename of the script.

As you can see it’s quite straight forward a copy-paste action from the graphical scheme. Even references are not represented by a difficult relational helper, instead if you want to reference a company object you can just do that (we actually did that – look for example at the last line of the gql script above). As a result when you execute the above script you get all the Types necessary to fill data in in the next step.

So that’s it for this part – in the next part of this series we will start the initial data import using a small tool which reads the mirrored data and outputs gql insert queries.

The “CrunchBase use-case” – part 2 – A short introduction

Where to start: existing data scheme and API

This series already tells in it’s name what the use case is: The “CrunchBase”.  On their website they speak for themselves to explain what it is: “CrunchBase is the free database of technology companies, people, and investors that anyone can edit.”. There are many reasons why this was chosen as a use-case. One important reason is that all data behind the CrunchBase service is licensed under Creative-Commons-Attribution (CC-BY) license. So it’s freely available data of high-tech companies, people and investors.

Currently there are more than 40.000 different companies, 51.000 different people and 4.200 different investors in the database. The flood of information is big and the scale of connectivity even bigger. The graph represented by the nodes could be even bigger than that but because of the limiting factors of current relational database technology it’s not feasible to try to do that.

sones GraphDB is coming to the rescue: because it’s optimized to handle huge datasets of strongly connected data. Since the CrunchBase data could be uses as a starting point to drive connectivity to even greater detail it’s a great use-case to show these migration and handling.

Thankfully the developers at CrunchBase already made one or two steps into an object oriented world by offering an API which answers queries in JSON format. By using this API everyone can access the complete data set in a very structured way. That’s both good and bad. Because the used technologies don’t offer a way to represent linked objects they had to use what we call “relational helpers”. For example: A person founded a company. (person and company being a JSON object). There’s no standardized way to model a relationship between those two. So what the CrunchBase developers did is they added an unique-Identifier to each object. And they added a new object which is uses as a “relational helper”-object. The only purpose of these helper objects is to point towards a unique-identifier of another object type. So in our example the relationship attribute of the person object is not pointing directly to a specific company or relationship, but it’s pointing to the helper object which stores the information which unique-identifier of which object type is meant by that link.

To visualize this here’s the data scheme behind the CrunchBase (+all currently available links):

As you can see there are many more “relational helper” dead-ends in the scheme. What an application had to do up until now is to resolve these dead-ends by going the extra mile. So instead of retrieving a person and all relationships, and with them all data that one would expect, the application has to split the data into many queries to internally build a structure which essentially is a graph.

Another example would be the company object. Like the name implies all data of a company is stored there. It holds an attribute called investments which isn’t a primitive data type (like a number or text) but a user defined complex data type. This user defined data type is called List<FundingRoundStructure>. So it’s a simple list of FundingRoundStructure objects.

When we take a look at the FundingRoundStructure there’s an attribute called company which is made up by the user defined data type CompanyStructure. This CompanyStructure is one of these dead-ends because there’s just a name and a unique-id. The application now needs retrieve the right company object with this unique-id to access the company information.

Simple things told in a simple way: No matter where you start, you always will end up in a dead-end which will force you to start over with the information you found in that dead-end. It’s not user-friendly nor easy to implement.

The good news is that there is a way to handle this type of data and links between data in a very easy way. The sones GraphDB provides a rich set of features to make the life of developers and users easier. In that context: If we would like to know which companies also received funding from the same investor like let’s say the company “facebook” the only thing necessary would be one short query. Beside that those “relational helpers” are redundant information. That means in a graph database this information would be stored in the form of edges but not in any helper objects.

The reason why the developers of CrunchBase had to use these helpers is that JSON and the relational table behind it isn’t able to directly store this information or to query it directly. To learn more about those relational tables and databases try this link.

I want to end this part of the series with a picture of the above relational diagram (without the arrows and connections).

The next part of the series will show how we can access the available information and how a graph scheme starts to evolve.

The “CrunchBase use-case” – part 1 – Overview

If you want to explain how easy it is for a user or developer to use the sones GraphDB to work on existing datasets you do that by showing him an example – a use case. And this is exactly what this short series of articles will do: It’ll show the important steps and concepts, technologies and designs behind the use case and the sones GraphDB.

The sones GraphDB is a DBMS focusing on strong connected unstructured and semi-structured data. As the name implies these data sets are organized in Nodes and Edges objectoriented in a graph data structure.

“a simple graph”

To handle these complex graph data structures the user is given a powerful toolset: the graph query language. It’s a lot like SQL when it comes to comprehensibility – but when it comes to functionality it’s completely designed to help the user do previously tricky or impossible things with one easy query.

This articles series is going to show how real conventional-relational data is aggregated and ported to an easy to understand and more flexible graph datastructure using the sones GraphDB. And because this is not only about telling but also about doing we will release all necessary tools and source codes along with this article. That means: This is a workshop and a use case in one awesome article series.

The requirements to follow all steps of this series are: You want to have a working sone GraphDB. Because we just released the OpenSource Edition Version 1.1 you should be fine following the documentation on how to download and install it here. Beside that you won’t need programming skills but if you got them you can dive deep into every aspect. Be our guest!

This first article is titled “Overview” and that’s what you’ll get:

part 1: Overview

part 2: A short introduction into the use-case and it’s relational data

part 3: Which data and how does a GQL data scheme start?

part 4: The initial data import

part 5:  Linking nodes and edges: What’s connected with what and how does the scheme evolve?

part 6: Querying the data and how to access it from applications?

How To strip those TFS Source Control references from Visual Studio Solutions

Every once in a while you download some code and fire up your Visual Studio and find out that this particular solution was once associated to a team foundation server you don’t know or have a login to. Like when you download source code from CodePlex and you get this “Please type in your username+password for this CodePlex Team Foundation Server”.

Or maybe you’re working on your companies team foundation server and you want to put some code out in the public. You surely want to get rid of these Team Foundation Server bindings.

There’s a fairly complicated way in Visual Studio to do this but since I was able to produce unforseen side effects I do not recommend it.

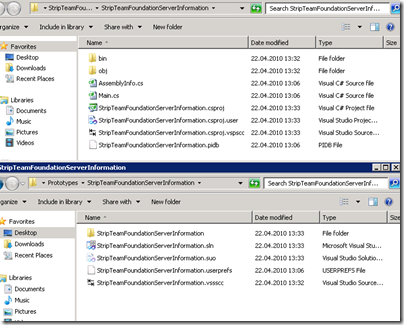
So what I did was looking into those files a Visual Studio Solution and Project consists of. And I found that there are really just a few files that hold those association information. As you can see in the picture below there are several files side by side to the .sln and .csproj files – like that .vssscc and .vspscc file. Even inside the .csproj and .sln file there are hints that lead to the team foundation server – so obviously besides removing some files a tool would have to edit some files to remove the tfs association.

strip-files

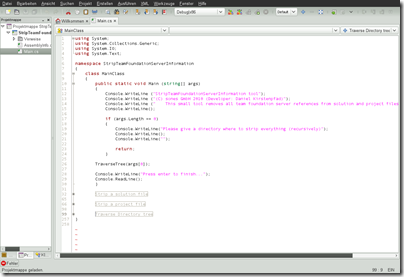
So I wrote such a tool and I am going release it’s source code just beneath this article. Have fun with it. It compiles with Visual Studio and even Mono Xbuild – actually I wrote it with Monodevelop on Linux ;) Multi-platform galore! Who would have thought of that in the founding days of the .NET platform?

Bildschirmfoto-StripTeamFoundationServerInformation - Main.cs - MonoDevelop

So this is easy – this small tool runs on command line and takes one parameter. This parameter is the path to a folder you want to traverse and remove all team foundation server associations in. So normally I take a check-out folder and run the tool on that folder and all its subfolders to remove all associations.

So if you want to have this cool tool you just have to click here: Sourcecode Download

I am a space ship captain. Not.

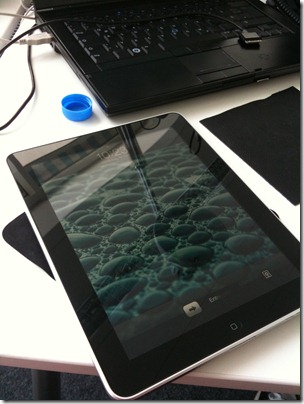
So finally after years and years of hope and nerdy ideas I am able to hold a tablet device in my own hands and it’s not only as good as Picards tablet was back in that great “Star Trek: Next Generation” series, it’s better.

IMG_0964

Of course I had to import that particular iPad from the U.S. (thanks Alex!) – actually it was the first time I imported something that expensive. Beside some fun with the shipping company everything went fine. Since Apple just announced to delay the launch of the iPad in Europe for a month it’s nice to have a gadget just a few weeks after it was available in the U.S.

Using Windows Deployment Services (WDS) to install Linux over Network (PXE)

Developing software is hard work – especially when you target several operating systems. One task that you have to perform quite often would be to deploy a new installation of an operating system as fast as possible on a test machine.

Doing this with Windows is easy – you can use the Windows Deployment Services to bootstrap Windows onto almost every machine which can boot over ethernet using PXE. Everything needed to make WDS work on a Windows Boot-Image is located on that image. Since it’s that easy I won’t dive into more detail here.

What I want to show in greater detail is how you can use WDS to deploy even Linux over your network.

Step 1: Get PXELINUX

What’s needed to boot Linux over a network is a dedicated PXE Boot Loader. This one is called PXELINUX and can be downloaded here.

“PXELINUX is a SYSLINUX derivative, for booting Linux off a network server, using a network ROM conforming to the Intel PXE (Pre-Execution Environment) specification.”

On the homepage of PXELINUX is also a short tutorial which files you need and where to copy them.

Step 2: Setup WDS with PXELINUX

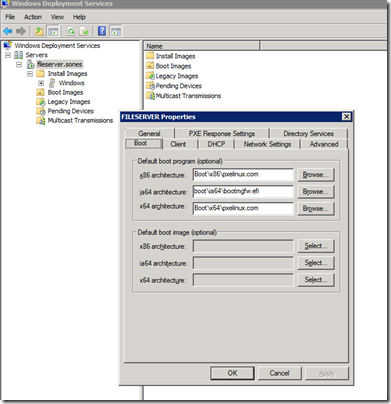
I suppose you got your WDS Installation up and running and you are able to deploy Windows. If that’s the case you can go to your WDS Server Management Tool and right-click on the server name – in my case “fileserver.sones”. If you select “Properties” in the context menu you would see the properties windows like in the screenshot below:

wds_pxelinux

You have to change the Boot-Loader from the standard Windows BootMgr to the newly downloaded PXELINUX bootloader. Since this bootloader comes with it’s own set of config files you can edit this config file to allow booting into Windows.

Step 3: Edit PXELINUX configuration filewds-pxelinux-2 

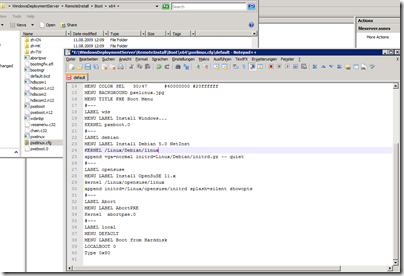
The first entry I made into the boot menu of the PXELINUX boot loader is the “Install Windows…” entry. Since the first thing the users will see after booting is the PXELINUX loader menu they need to be able to continue to their Windows Installation. Since this Windows Installation cannot be handled by the PXELINUX loader you have to define a boot menu entry which looks a lot like this:

LABEL wds
MENU LABEL Install Windows…
KERNEL pxeboot.0

To add OpenSuSE to the menu you would add an entry looking like this:

LABEL opensuse
MENU LABEL Install OpenSuSE 11.x
kernel /Linux/opensuse/linux
append initrd=/Linux/opensuse/initrd splash=silent showopts

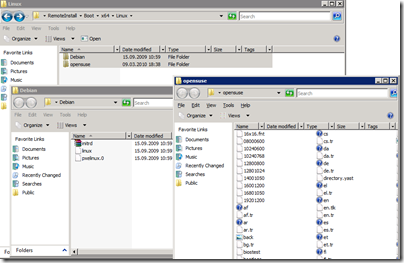
The paths given in the above entry should be altered according to the paths you’re using in your installation. I took the /Linux/opensuse/ files from the network install dvd images of OpenSuSE.

wds-pxelinux-3

That’s basically everything there is about the installation of Linux (Debian works accordingly) over PXE and WDS.

And finally this is what it should look like if everything worked great:


Source 1: http://en.wikipedia.org/wiki/Preboot_Execution_Environment
Source 2: http://syslinux.zytor.com/wiki/index.php/PXELINUX

sones at CeBIT 2010

Die CeBIT ist um und sones schliesst seinen Auftritt im Rahmen der Partnerschaft mit Microsoft mit einem durch und durch positiven Ergebnis ab.Ich selbst hatte ja aufgrund einer ungünstigen Terminsituation nur am Montag und am Freitag die Möglichkeit persönlich vor Ort zu sein.

Die CeBIT war dieses Jahr eine schöne Möglichkeit einmal im breiteren Rahmen als auf den sonst üblichen Konferenzen und Veranstaltungen zu netzwerken.

sones hatte die Gelegenheit zusammen mit anderen Partnerunternehmen am Microsoft Stand in Halle 4 auszustellen. Geniale Sache war das insofern dass wir sowohl am Stand als auch im Rahmen des MSDN Developer Kinos die Möglichkeit hatten unsere Technologie mit Demonstrationen und Worten vorzustellen.

IMG_0321

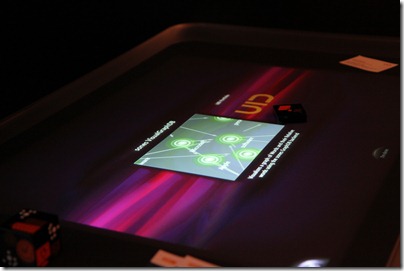
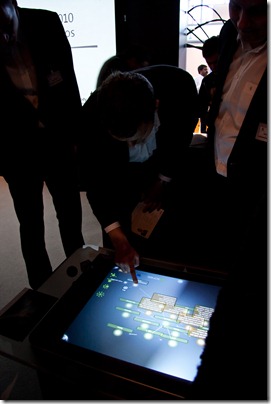
Ich hatte ja schon darüber geschrieben dass wir eine Demo für die CeBIT auf Basis des Microsoft Surface Multi-Touch Tisches entwickelt haben. Das Feedback zu dieser Demo war durchweg extrem positiv. Es ist eben ein Unterschied für viele nicht-Techniker wenn man Ihnen einen Graph grafisch vor Augen führt und in diesem Graphen navigieren kann.

Für die Techniker auf der anderen Hand hat sich Henning nocheinmal hingesetzt und ein wenig weiter ausgeführt was hinter der Surface Demo steckt. Das kann man hier nachlesen.

Hier ein paar Impressionen:

IMG_1843 

IMG_1836


Source: http://www.dreiundzwanzig.biz/?p=35

Still 9 days to go till SXSW 2010

Since there are still 9 days to go till SXSW 2010 it’s a pleasure to give out a link to the completely unofficial torrents which old all mp3 files of almost all songs which are to be presented at this years SXSW:

“The SXSW® Music and Media Conference showcases hundreds of musical acts from around the globe on over eighty stages in downtown Austin. By day, conference registrants do business in the SXSW® Trade Show in the Austin Convention Center and partake of a full agenda of informative, provocative panel discussions featuring hundreds of speakers of international stature.”

sxsw 

Source 1: http://www.sxsw.com/music
Source 2: http://sites.google.com/site/sxswtorrent/2010

Want. To. Buy. :-)

Oh what a nice n3rd toy this would be. Rumors say it will be available soon for under $30. And for those who right now think: “What the hell is this?” – This is a coffee mug in the shape of a quite expensive canon lens. In fact I already heard of that idea more than a year ago and wrote about it here. At this time there were only hopes that it would be produced.

canonlensmug


Source: http://www.petapixel.com/2010/03/06/canon-lens-mug-purchased-in-canada/